
5 Minute Yoga , If you are a busy and professional individual with limited time for yoga, you can benefit from 5-minute yoga routines. These routines can help you relax your body, boost your energy, and enhance your focus. Here are some simple yet effective yoga routines for 5 minutes:
Chaturanga:
-
Introduction to Chaturanga
is one of the fundamental and highly important poses in yoga, especially designed to strengthen the upper body muscles, including the arms, shoulders, chest, and also the core muscles. This movement is essentially a type of push-up, where you must focus your body weight on your hands and toes while keeping your body in a straight, horizontal line from head to toe.
-
Chaturanga in Yoga Practices
Chaturanga is one of the main poses in most yoga practices and is frequently used in many forms of yoga, particularly in Vinyasa and Ashtanga sequences. This pose serves as a foundation for more advanced movements such as Chaturanga to Crow or even Chaturanga to Headstand.
-
Challenges in Performing Chaturanga
Although this pose may seem simple at first glance, performing it correctly requires skills like body control, muscle strength, flexibility, and coordination. One of the main challenges in performing Chaturanga is maintaining proper alignment. Many people might initially struggle to keep their bodies in a straight line or control their movement and breathing.
-
Benefits of Consistent Practice
However, with consistent practice, this movement gradually strengthens the muscles, improves power, and enhances balance and coordination. In addition to its physical benefits, Chaturanga can also have positive mental and psychological effects. Focusing on the breath, controlling the movement, and maintaining body strength while facing a challenge can help strengthen mental focus and induce a sense of inner calm.
-
Chaturanga’s Role in Yoga Practice
Ultimately, Chaturanga plays a crucial role in improving both the physical and mental aspects of practitioners’ yoga practice and can be seen as a foundation for more advanced exercises.
-
Physical Strengthening and Injury Prevention
This pose is particularly effective in strengthening the arms, shoulders, chest, and core muscles, which in turn can improve posture, increase endurance, and help prevent injuries caused by muscular weakness.
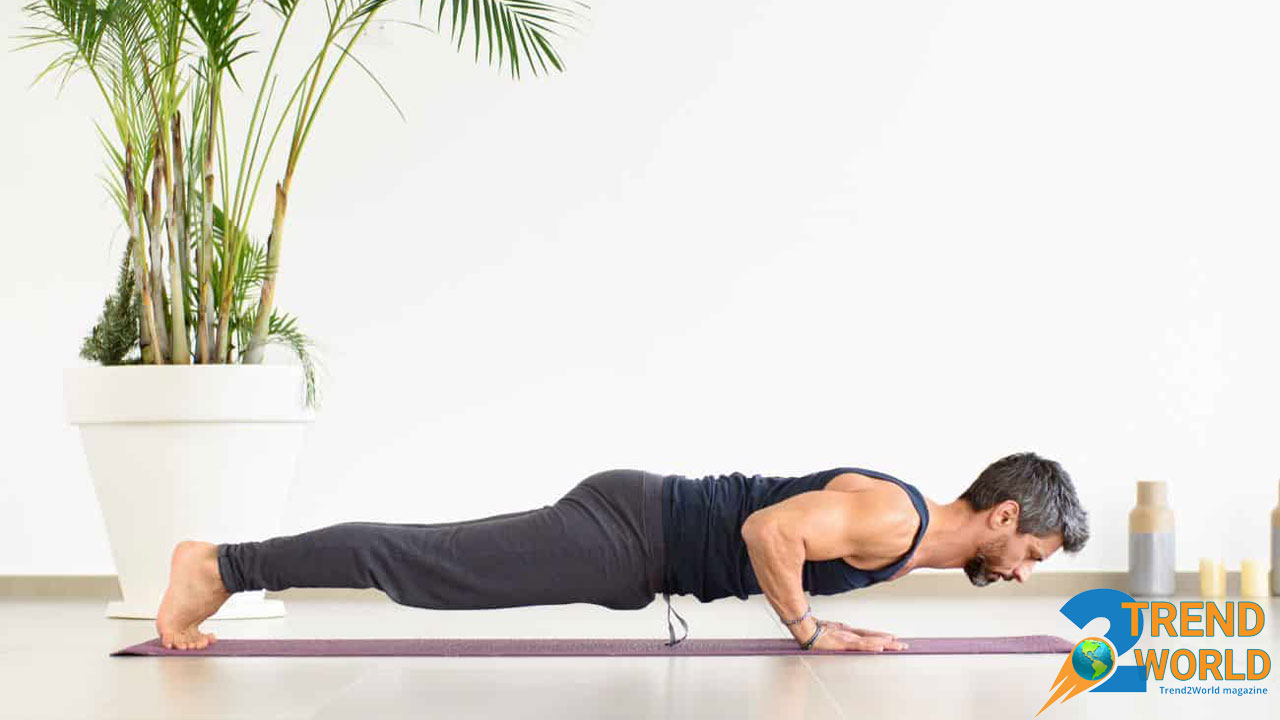
The steps of performing the Chaturanga movement:
-
Starting Position:
- Enter the plank position with your hands under your shoulders and body straight.
- Legs should be positioned behind you, and your weight should be on your hands and toes.
-
Lowering the Body:
- Bend your elbows, keeping them close to your body (20-30 degrees).
- Ensure your body remains in a straight line from head to toes without letting your back or hips drop.
-
Holding the Position:
- Keep your body parallel to the ground, avoiding full contact with the floor.
- The goal is to perform a push-up motion while maintaining body alignment.
-
Breathing:
- Control your breathing during the movement.
- Exhale as you lower your body and inhale as you return to plank.
-
Returning to Plank:
- After lowering your body, press your hands into the ground to lift your body back to plank.
-
Key Points:
- Control the movement slowly and avoid fast motions to prevent injury.
- Keep your body straight during the entire movement.
- Focus on proper breathing to enhance the flow.
-
Benefits of Chaturanga:
- Strengthens arms, shoulders, chest, and back muscles.
- Improves core endurance, body stability, flexibility, posture, and balance.
-
Usage in Yoga:
- A challenging pose often used as a prerequisite for more complex movements in yoga practices.
Our recommended product for you to have the best yoga experience – click on the image below!
 Trending Home! Our top fitness, health, and yoga picks are flying off the shelves—don’t miss out!
 Grab yours before it’s too late!

Child’s Pose:
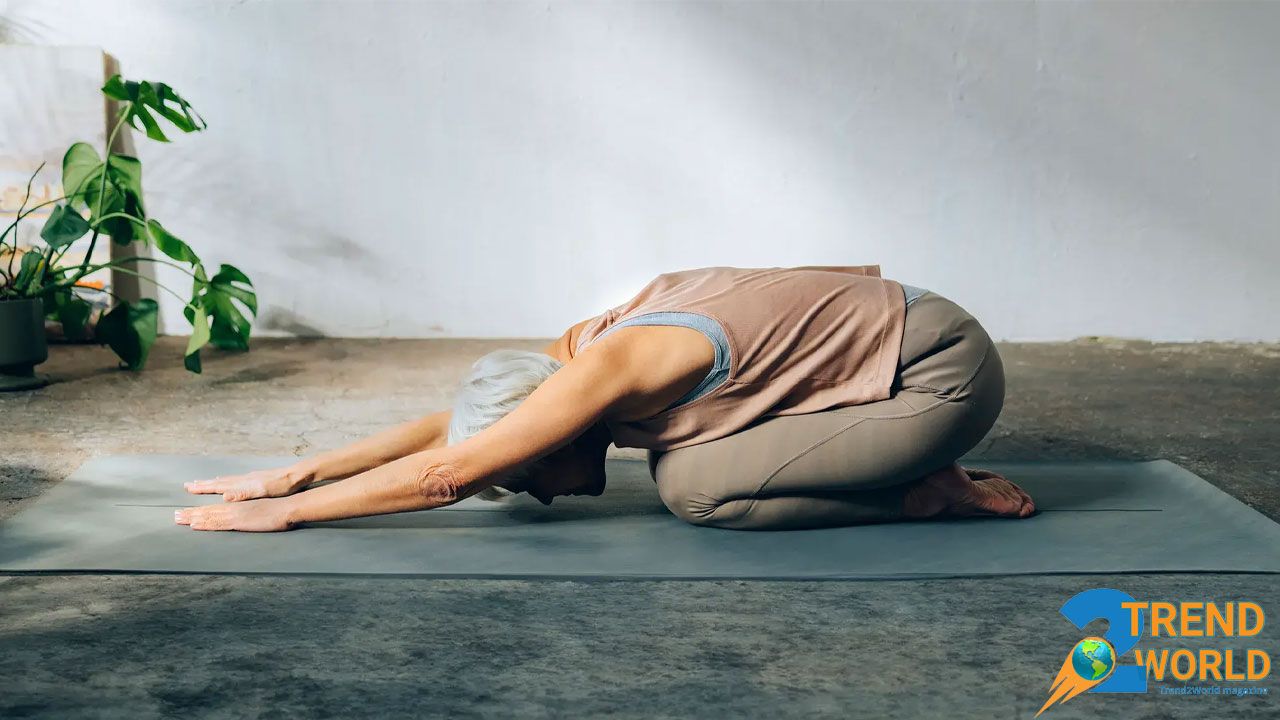
Introduction to Child’s Pose
5 Minute Yoga ,Child’s Pose is a calming and stretching yoga posture designed to improve spinal alignment, reduce body tension, and promote mental relaxation. This pose is often used as a restorative posture between yoga sequences, allowing individuals to rest while simultaneously experiencing a gentle stretch in various muscle groups. It can be particularly beneficial for those who spend long hours sitting at a desk or suffer from back pain.
Physical Benefits of Child’s Pose
In addition to its physical benefits, Child’s Pose also has positive psychological effects. In a world filled with stress and daily pressures, practicing this pose helps individuals take moments to rest and focus on deep breathing. While the pose may seem simple, it actually combines muscle stretching, mental relaxation, and mindful breathing, which together can help reduce stress, enhance flexibility, and improve overall body posture.
Targeted Areas and Suitability
In Child’s Pose, the body is positioned in a way that allows physical tension to be released while simultaneously calming the mind. This pose specifically targets the muscles of the back, spine, and neck, making it ideal for individuals who experience daily activities that place strain on these areas.
Conclusion
In this article, we will explore the proper technique for performing Child’s Pose and the benefits it offers.
The exact method of assessing a child’s condition:
Starting Position:
- Sit on the floor with your knees spread apart, about hip-width apart.
- Bring the soles of your feet together, allowing the tops of your feet to rest on the ground.
- Make sure your body weight is evenly distributed between both knees.
Forward Movement:
- Gently fold your body forward.
- Extend your arms in front of you, placing your palms flat on the ground.
- Your abdomen should move toward your thighs.
- If needed, stretch a little further to deepen the stretch in your back and shoulders.
Placing the Head:
- Slowly rest your forehead on the ground, keeping your head aligned with your spine.
- If your forehead doesn’t easily reach the floor, place a pillow or soft cushion under your forehead for comfort.
Stretch in Arms and Spine:
- Stretch your arms forward to feel the stretch in your arms and shoulders.
- Let your shoulders drop gently toward the ground to relieve tension in your neck and shoulders.
- Your spine should feel elongated and relaxed, with no pressure on your neck or lower back.
Deep Breathing:
- With each breath, allow your body to relax further.
- Breathe deeply through your nose, and with each exhale, release any tension in your body.
- Let your breath flow naturally and deeply. The longer you stay in the pose, the more relaxed your body and mind will become.
Duration of the Pose:
- Hold the pose for several breaths or a few minutes. Usually, 30 seconds to 2 minutes is ideal.
- If you’re a beginner, start with a shorter time and gradually increase it.
Exiting the Pose:
- To exit, gently lift your hands off the ground and bring your body back up.
- Slowly return to a seated position, taking a few deep breaths to let your body return to its natural state.
Important Notes:
- Focus on stretching and relaxation during the pose, and avoid any pressure on your body.
- If you feel discomfort in your knees or back, use a cushion under your knees or back for support.
- If you have any issues with your back or neck, consult a yoga instructor to adjust the pose for your needs.
Downward Facing Dog:

-
Introduction to Downward Facing Dog
5 Minute Yoga ,The Downward Facing Dog pose is one of the most well-known and widely practiced poses in yoga. It’s an essential part of many yoga routines because of its numerous benefits, such as strengthening muscles, increasing flexibility, and improving posture. This pose not only stretches the body but also strengthens key muscle groups, including the back, abdomen, legs, arms, and lower back.
-
Physical and Mental Benefits
In addition to its physical benefits, Downward Dog helps improve circulation, reduce stress and anxiety, and boost energy levels. It’s especially effective for opening the chest, strengthening the core, and providing a deep stretch in various areas of the body.
-
Versatility of the Pose
One reason this pose is so popular among yogis is its versatility. It can be held as a static pose for stretching and focus or used as a transition between other poses in a yoga flow.
-
Effects on the Body
Because Downward Facing Dog inverts the body, it promotes increased blood flow to the head and face, which can leave you feeling refreshed and energized. It also stretches the hamstrings, lower back, and arms, helping to relieve tension and gradually improve flexibility.
Steps to Perform the Downward Dog Pose:
1. Starting Position
Begin by sitting on the floor and then move into a hands-and-knees position (all fours).
Ensure that:
- Your hands are shoulder-width apart, with fingers spread forward.
- Your knees are hip-width apart and positioned directly under your hip joints.
- Your spine remains in a neutral position, avoiding excessive arching or rounding.
- Your head is naturally aligned with your spine.
2. Preparing the Body
Now that you are in the all-fours position:
- Gently press your fingers into the ground for more stability.
- Keep your shoulders aligned with your hands, pulling them slightly down and back to reduce strain.
- Press your knees lightly into the ground for additional stability.
3. Raising the Hips Upward and Back
- Engage your core and back muscles to lift your hips upward and back.
- Imagine forming an inverted triangle with your body, with your hands as the base.
- Feel the lengthening of your spine as your back moves upward and backward.
- Keep your head between your arms, maintaining a neutral and relaxed neck position.
- Slightly tuck your chin toward your chest to relieve tension in your neck.
4. Stretching the Back of the Legs
- Start by gently pressing your heels toward the ground. It’s normal if they don’t touch at first.
- If you find it difficult, bend your knees slightly to ease the tension in your hamstrings.
- Over time, try to straighten your legs and press your heels down for a deeper stretch.
- You should feel a stretch along the hamstrings, lower back, and calves.
5. Aligning Hands and Feet
- Ensure that your palms are fully pressing into the ground, applying pressure from the wrists.
- Keep your arms extended and fingers pointing forward and outward.
- Stretch your legs backward and downward.
- Maintain a hip-width distance between your feet, distributing weight evenly between hands and feet.
6. Focusing on Breathing
- Deep and steady breathing is essential in Downward-Facing Dog.
- With each inhale, visualize your spine lengthening and your body deepening into the stretch.
- On each exhale, release tension and allow your body to relax into the position.
- Synchronize your breath with your movements, breathing deeply into your abdomen and chest.
7. Holding the Pose
- Hold this position for several breaths before gently returning to all fours.
- If you want to extend your practice, stay in the pose for 30 seconds to 1 minute.
- If you feel discomfort, modify the pose or take a break as needed.
- To return to the starting position, lower your body slowly using your core muscles and return to all fours.
8. Additional Tips
- Avoid excessive bending or arching in the lower back; keep your spine long and straight.
- If you experience knee or shoulder pain, reduce the stretch intensity or use yoga props for support.
- If you feel fatigued or uncomfortable in any area, adjust the pose and rest when necessary.
- Downward-Facing Dog helps strengthen the core, improve flexibility in the legs and back, and enhance posture.
- When performed correctly with focus, this pose can greatly benefit body strength and stress relief.
Bridge Pose:
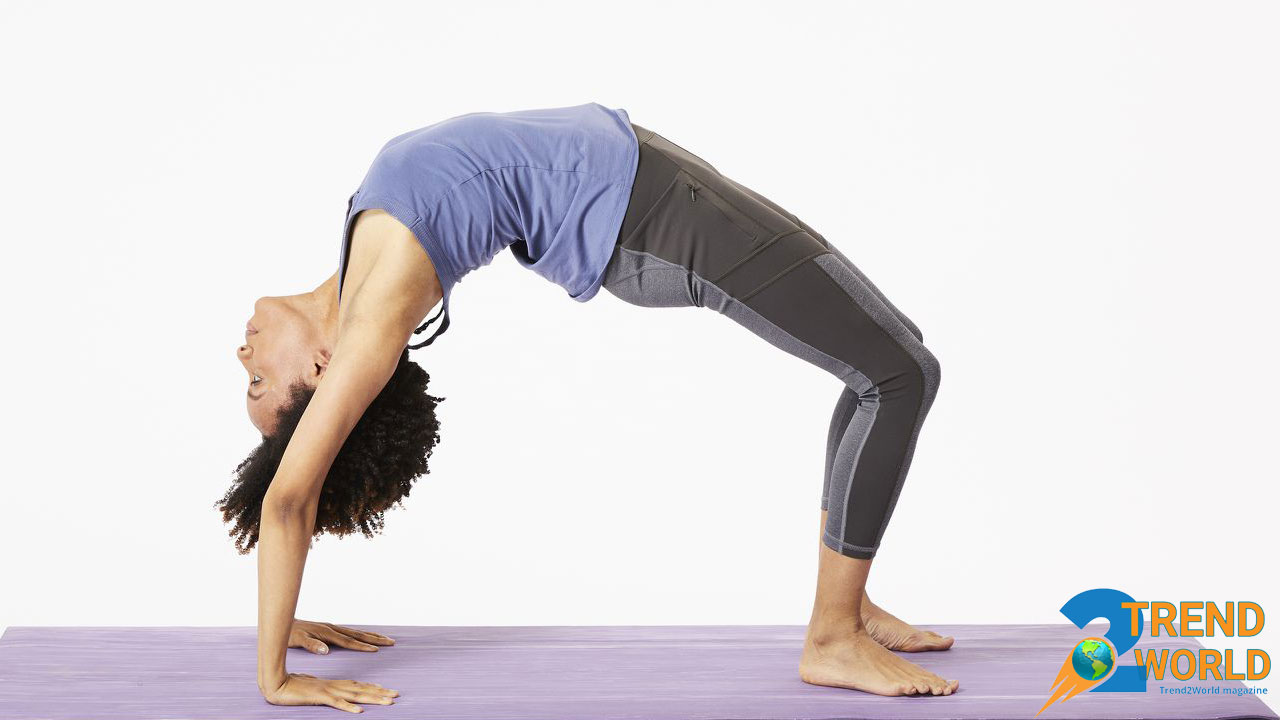
1. Introduction to Bridge Pose
5 Minute Yoga ,The Bridge Pose, or Setu Bandhasana in yoga, is a great exercise for strengthening the lower body and improving spinal flexibility.
2. Physical Benefits
It helps build muscle strength, improve posture, reduce back pain, and strengthen the core. Many athletes and fitness enthusiasts use this pose to target their glutes, hamstrings, and quadriceps.
3. Mental and Relaxation Benefits
Besides its physical benefits, the Bridge Pose also increases blood circulation to the pelvis and spine, promoting relaxation and easing muscle tension. This makes it an excellent exercise not only for building strength but also for reducing stress and enhancing overall well-being.
How to Perform the Bridge Pose:
1. Preparation and Starting Position:
- Lie on your back on the floor or a workout mat.
- Bend your knees and place your feet hip-width apart, flat on the ground. The distance between your feet should be approximately the width of your hips.
- Keep your arms at your sides with palms facing down. Your fingertips should be able to touch your heels.
- Keep your head and shoulders firmly on the ground, with your gaze directed upward.
2. Lifting the Hips:
- Press your feet into the floor and slowly lift your hips off the ground.
- Raise your spine off the floor, one vertebra at a time, until your body forms a straight line from your shoulders to your knees.
- Engage your glutes and core muscles to maintain balance and prevent excessive arching in the lower back.
3. Holding the Position:
- Slightly tuck your chest toward your chin (without straining your neck) to keep the spine elongated.
- For additional support, clasp your hands under your body and draw your shoulders slightly inward.
- Hold this position for 20 to 30 seconds while breathing deeply and steadily.
4. Returning to the Starting Position:
- Slowly lower your spine back down, one vertebra at a time.
- Rest your hips fully on the ground and take a few seconds to relax.
- Repeat the movement 3 to 5 times.
Seated Forward Bend:
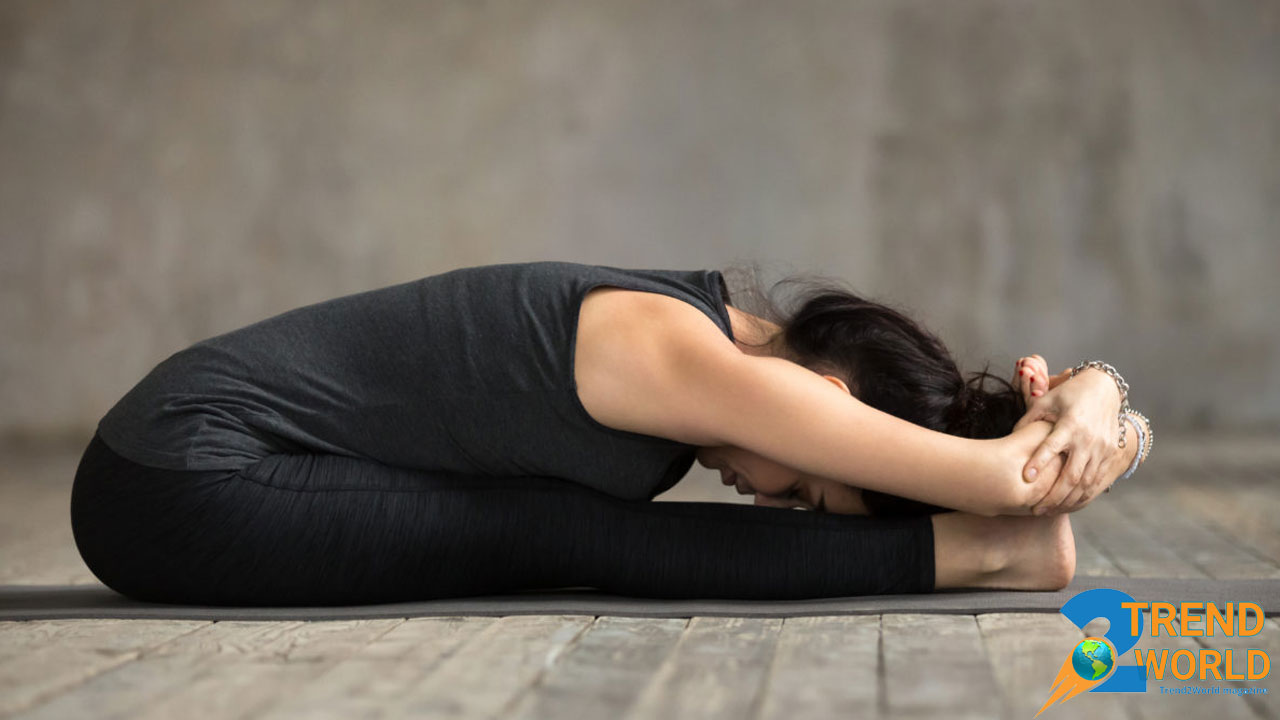
1. Pose Name and Description
5 Minute Yoga ,The Seated Forward Bend (Paschimottanasana) is one of the simple yet effective poses in yoga practice, especially designed to stretch the muscles of the back and hamstrings (the muscles at the back of the thighs). This pose is not only beneficial for improving body flexibility but also helps strengthen the muscles of the lower back, shoulders, and even the upper body.
2. Primary Focus
In this position, the primary focus is on stretching the back muscles and reducing physical tension.
3. Mental and Emotional Benefits
Along with its physical benefits, the seated position also aids in calming the mind and reducing stress and anxiety, as it is known to be a relaxing stretch.
4. Physical Benefits
Regularly practicing this pose can lead to improved posture, reduced muscle tightness, and an increased range of motion in the joints.
5. Target Areas
Additionally, since the pose involves bending forward, it helps enhance flexibility in the lower back and hamstrings, which is especially useful for individuals who often experience muscle pain in these areas.
6. Overall Significance
Overall, the Seated Forward Bend is recognized as a foundational and effective yoga pose for achieving greater flexibility and alleviating chronic pain in the body.
The stages of performing the Seated Forward Bend:
1. Preparation:
- Sit on the floor with your legs straight out in front of you.
- Point your toes toward the ceiling or towards yourself.
- Keep your legs about hip-width apart or slightly wider.
- Make sure you’re sitting up straight. You can use a blanket or cushion under your sitting bones for added comfort.
2. Aligning the Spine:
- Roll your shoulders back and down to open up your chest.
- Lengthen your spine from the lower back all the way up to the top of your head. This will help stretch your lower back and prevent injury.
- Place your hands on your thighs, knees, or shins and focus on deep breathing.
3. Starting the Forward Fold:
- As you inhale deeply, hinge forward from your hips (not your lower back). Your hips should move first, followed by a gentle fold in your back.
- Keep your spine straight and elongated throughout the movement. Don’t round your back.
4. Reaching the Stretch and Holding:
- Once you feel a stretch, start reaching your hands toward your feet along your legs.
- If you can’t reach your toes, don’t worry. You can hold your shins, ankles, or knees instead. The goal is to keep your back straight and move forward, not down.
- Take deep breaths and allow your body to relax into the stretch. You can hold this position for 20-30 seconds or longer if it feels comfortable.
5. Being Careful with the Stretch:
- Avoid pushing too hard or stretching too quickly. The stretch should feel comfortable, with a gradual increase in flexibility.
- If you feel pain in your lower back or hamstrings, ease off and reduce the intensity of the stretch. It’s important to feel a gentle, comfortable stretch, not pain.
6. Returning to the Starting Position:
- To come back to the seated position, slowly and carefully move your body back. Focus on your lower back and hips.
- Lift your pelvis first, then keep your spine straight as you return to a seated position.
- Take a deep breath as you slowly come back to your starting position.
7. Resting and Adjusting After the Movement:
- After the stretch, it’s normal to feel a stretch in your hamstrings or lower back.
- You can do some gentle stretching to relax your muscles, especially in the lower back and legs.
Additional Tips:
- Breathing: Focus on slow, deep breaths. Exhale as you fold forward and inhale as you return to the starting position.
- Gradual Progression: If you can’t reach your toes right away, that’s okay. With regular practice, your flexibility will improve over time.
- Back Care: If you have back or spine issues, it’s best to consult with a professional before doing this stretch to avoid injury.
Our recommended product for you to have the best yoga experience – click on the image below!
Trending Home! Our top fitness, health, and yoga picks are flying off the shelves—don’t miss out!
Grab yours before it’s too late!
Warrior II Pose:
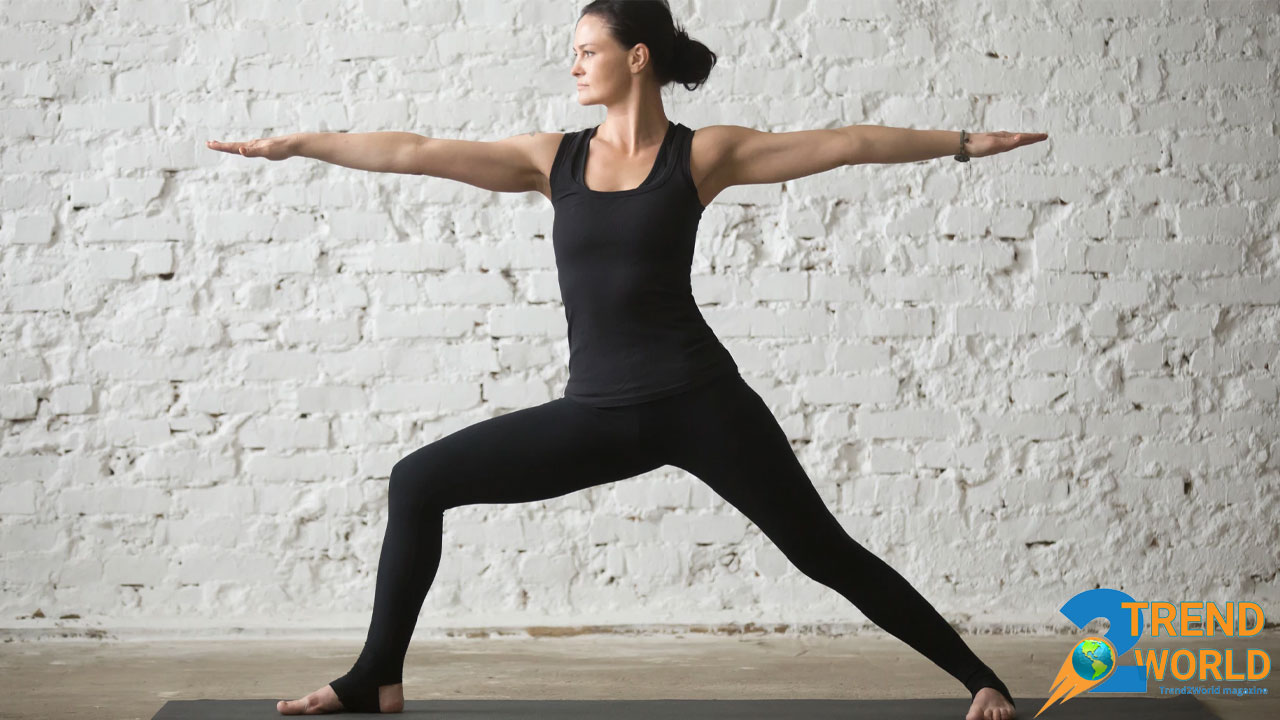
1. Introduction to Warrior II Pose
5 Minute Yoga ,Warrior II Pose, or “Virabhadrasana II” in Sanskrit, is a popular and effective yoga posture that combines strength, balance, and focus.
2. Physical Benefits
This pose strengthens and tones various muscles in the body while improving flexibility, mental focus, and endurance.
3. Muscle Engagement
In Warrior II, the entire body is engaged, from the legs to the arms and shoulders. It primarily focuses on strengthening the lower body, especially the thighs and hips, as well as the upper body, particularly the shoulders and arms.
4. Mental and Emotional Benefits
Additionally, holding this pose helps improve balance and mental strength, and it can reduce stress and anxiety.
5. Holistic Practice
Warrior II is not just a physical exercise but also a tool for enhancing focus, inner balance, and self-awareness. When practiced with proper concentration and breathing, it creates a powerful connection between the body and mind, making it a well-rounded and complete yoga practice.
Steps to perform Warrior 2:
1. Start in a Standing Position:
5 Minute Yoga ,Stand at the center of your mat with your feet hip-width apart. Keep your body straight and tall. Relax your shoulders by pulling them back and down, with your arms naturally at your sides. Focus on feeling stable and grounded.
2. Spread Your Legs:
From standing, widen your stance. Your feet should be about 3 to 4 feet apart (around 1 meter), or adjusted based on your body size. When you squat, your thighs should be parallel to the floor.
3. Rotate Your Feet:
Turn your right foot 90 degrees outward, with your toes pointing forward. Rotate your left foot slightly inward (about 15-30 degrees). Your right heel should line up with the toes of your left foot.
4. Bend Your Knees:
Bend your right knee until your right thigh is parallel to the floor. Make sure your knee doesn’t extend beyond your toes and keep your weight on your right heel. Keep your left leg straight and avoid letting your left knee move out of alignment.
5. Lift Your Arms:
Raise your arms parallel to the ground, keeping your fingers fully extended. Relax your shoulders and bend your elbows slightly to avoid strain. Make sure your shoulders are relaxed and not tense.
6. Adjust Your Body and Focus:
Look straight ahead, focusing on the tips of your right toes. Stay focused on maintaining balance and alignment. Your legs should feel strong, and your body should be in a straight line. Engage your core to avoid straining your lower back.
7. Breathe Deeply:
Take slow, deep breaths. Stay focused on your breath and try to clear your mind. With each inhale, feel energy flow through your body.
8. Hold the Pose:
Hold this position for 30 seconds to 1 minute. If you feel stable and comfortable, you can extend the time. Always focus on maintaining proper form and enjoy the stretch.
9. Exit the Pose:
To come out, lower your arms and return to standing. Bring your feet together and return to the starting position (Tadasana). Repeat on the other side.
Important Tips:
- Keep Your Spine Straight: Avoid unnecessary stretching in your lower back.
- Don’t Overload Your Knees: Keep your knees aligned and avoid putting too much pressure on them.
- Focus on Breathing: Deep, steady breaths will help you stay calm and maintain endurance.
Benefits of Warrior 2:
- Strengthens Lower Body: This pose strengthens the thighs, calves, and glutes.
- Improves Flexibility and Balance: It helps with balance and increases flexibility.
- Engages Upper Body: It also strengthens the shoulders, arms, and hands.
- Enhances Focus and Mental Strength: The concentration required helps improve mental focus and endurance.
Don’t Miss Out on the Latest Trends! 
Follow us on TikTok for exclusive gift ideas, trends, and inspiration! 

 At
At