
- Balasana
- Marjaryasana-Bitilasana
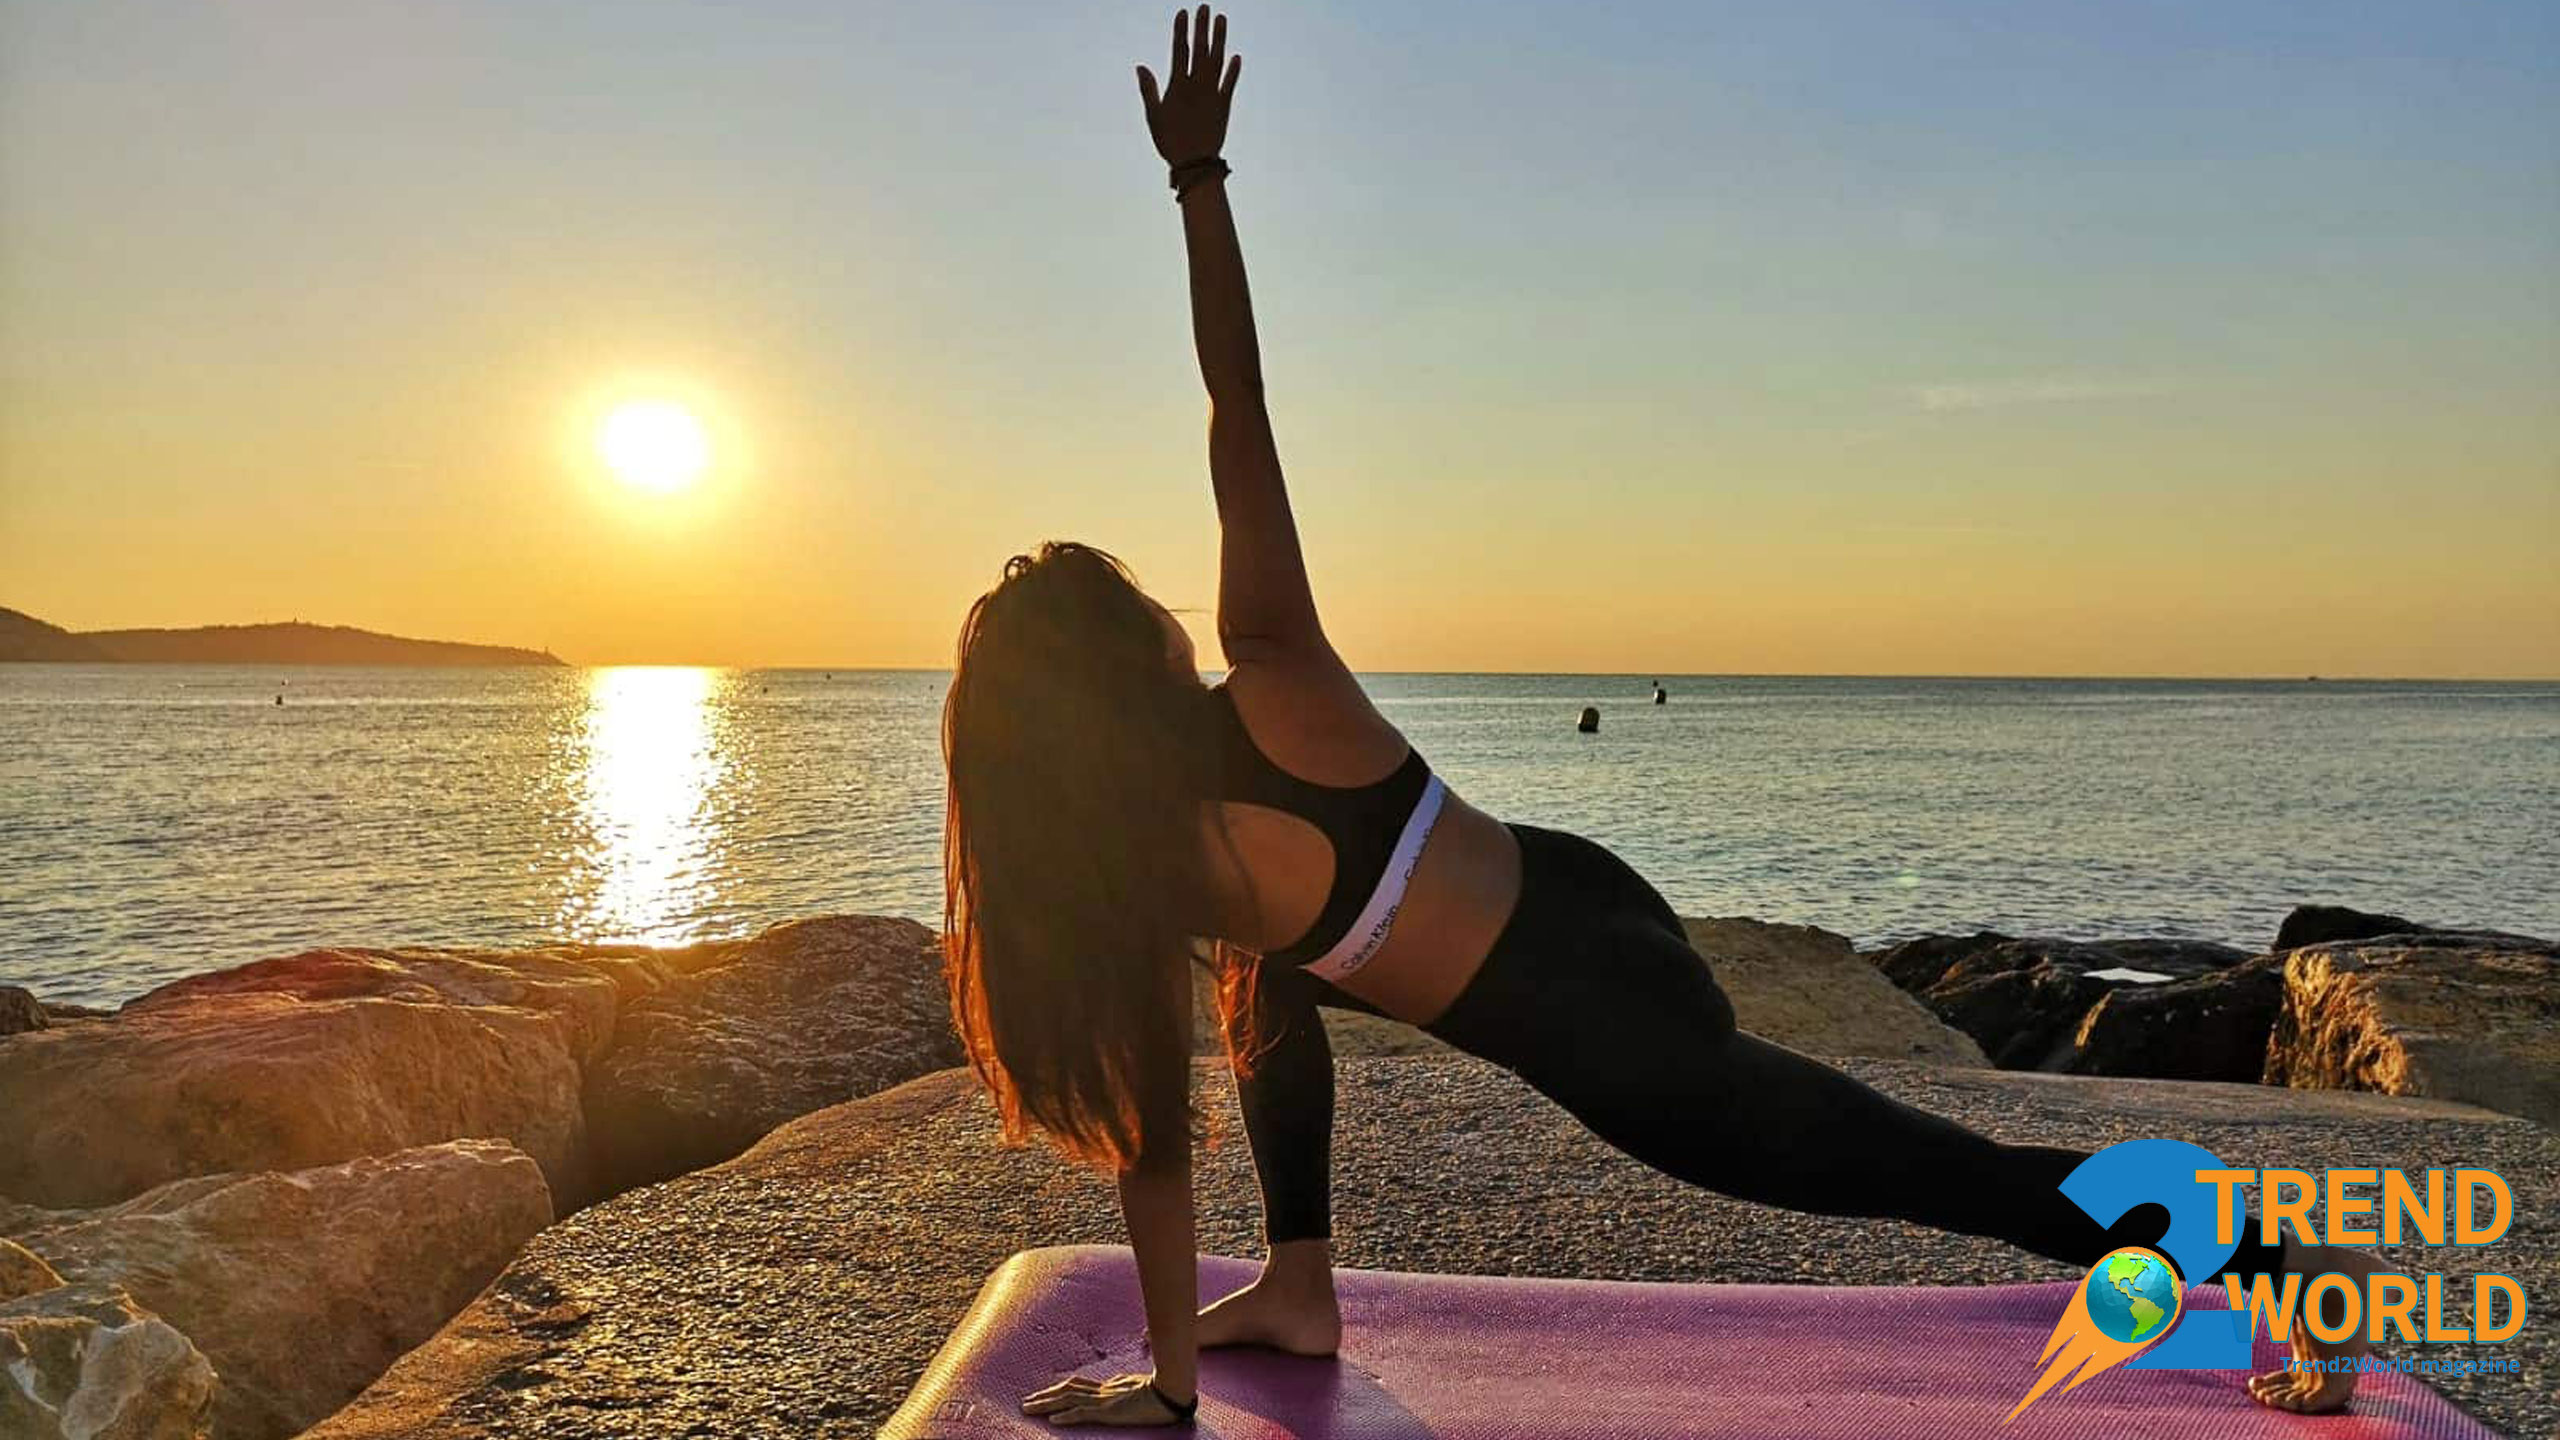
- Trikonasana
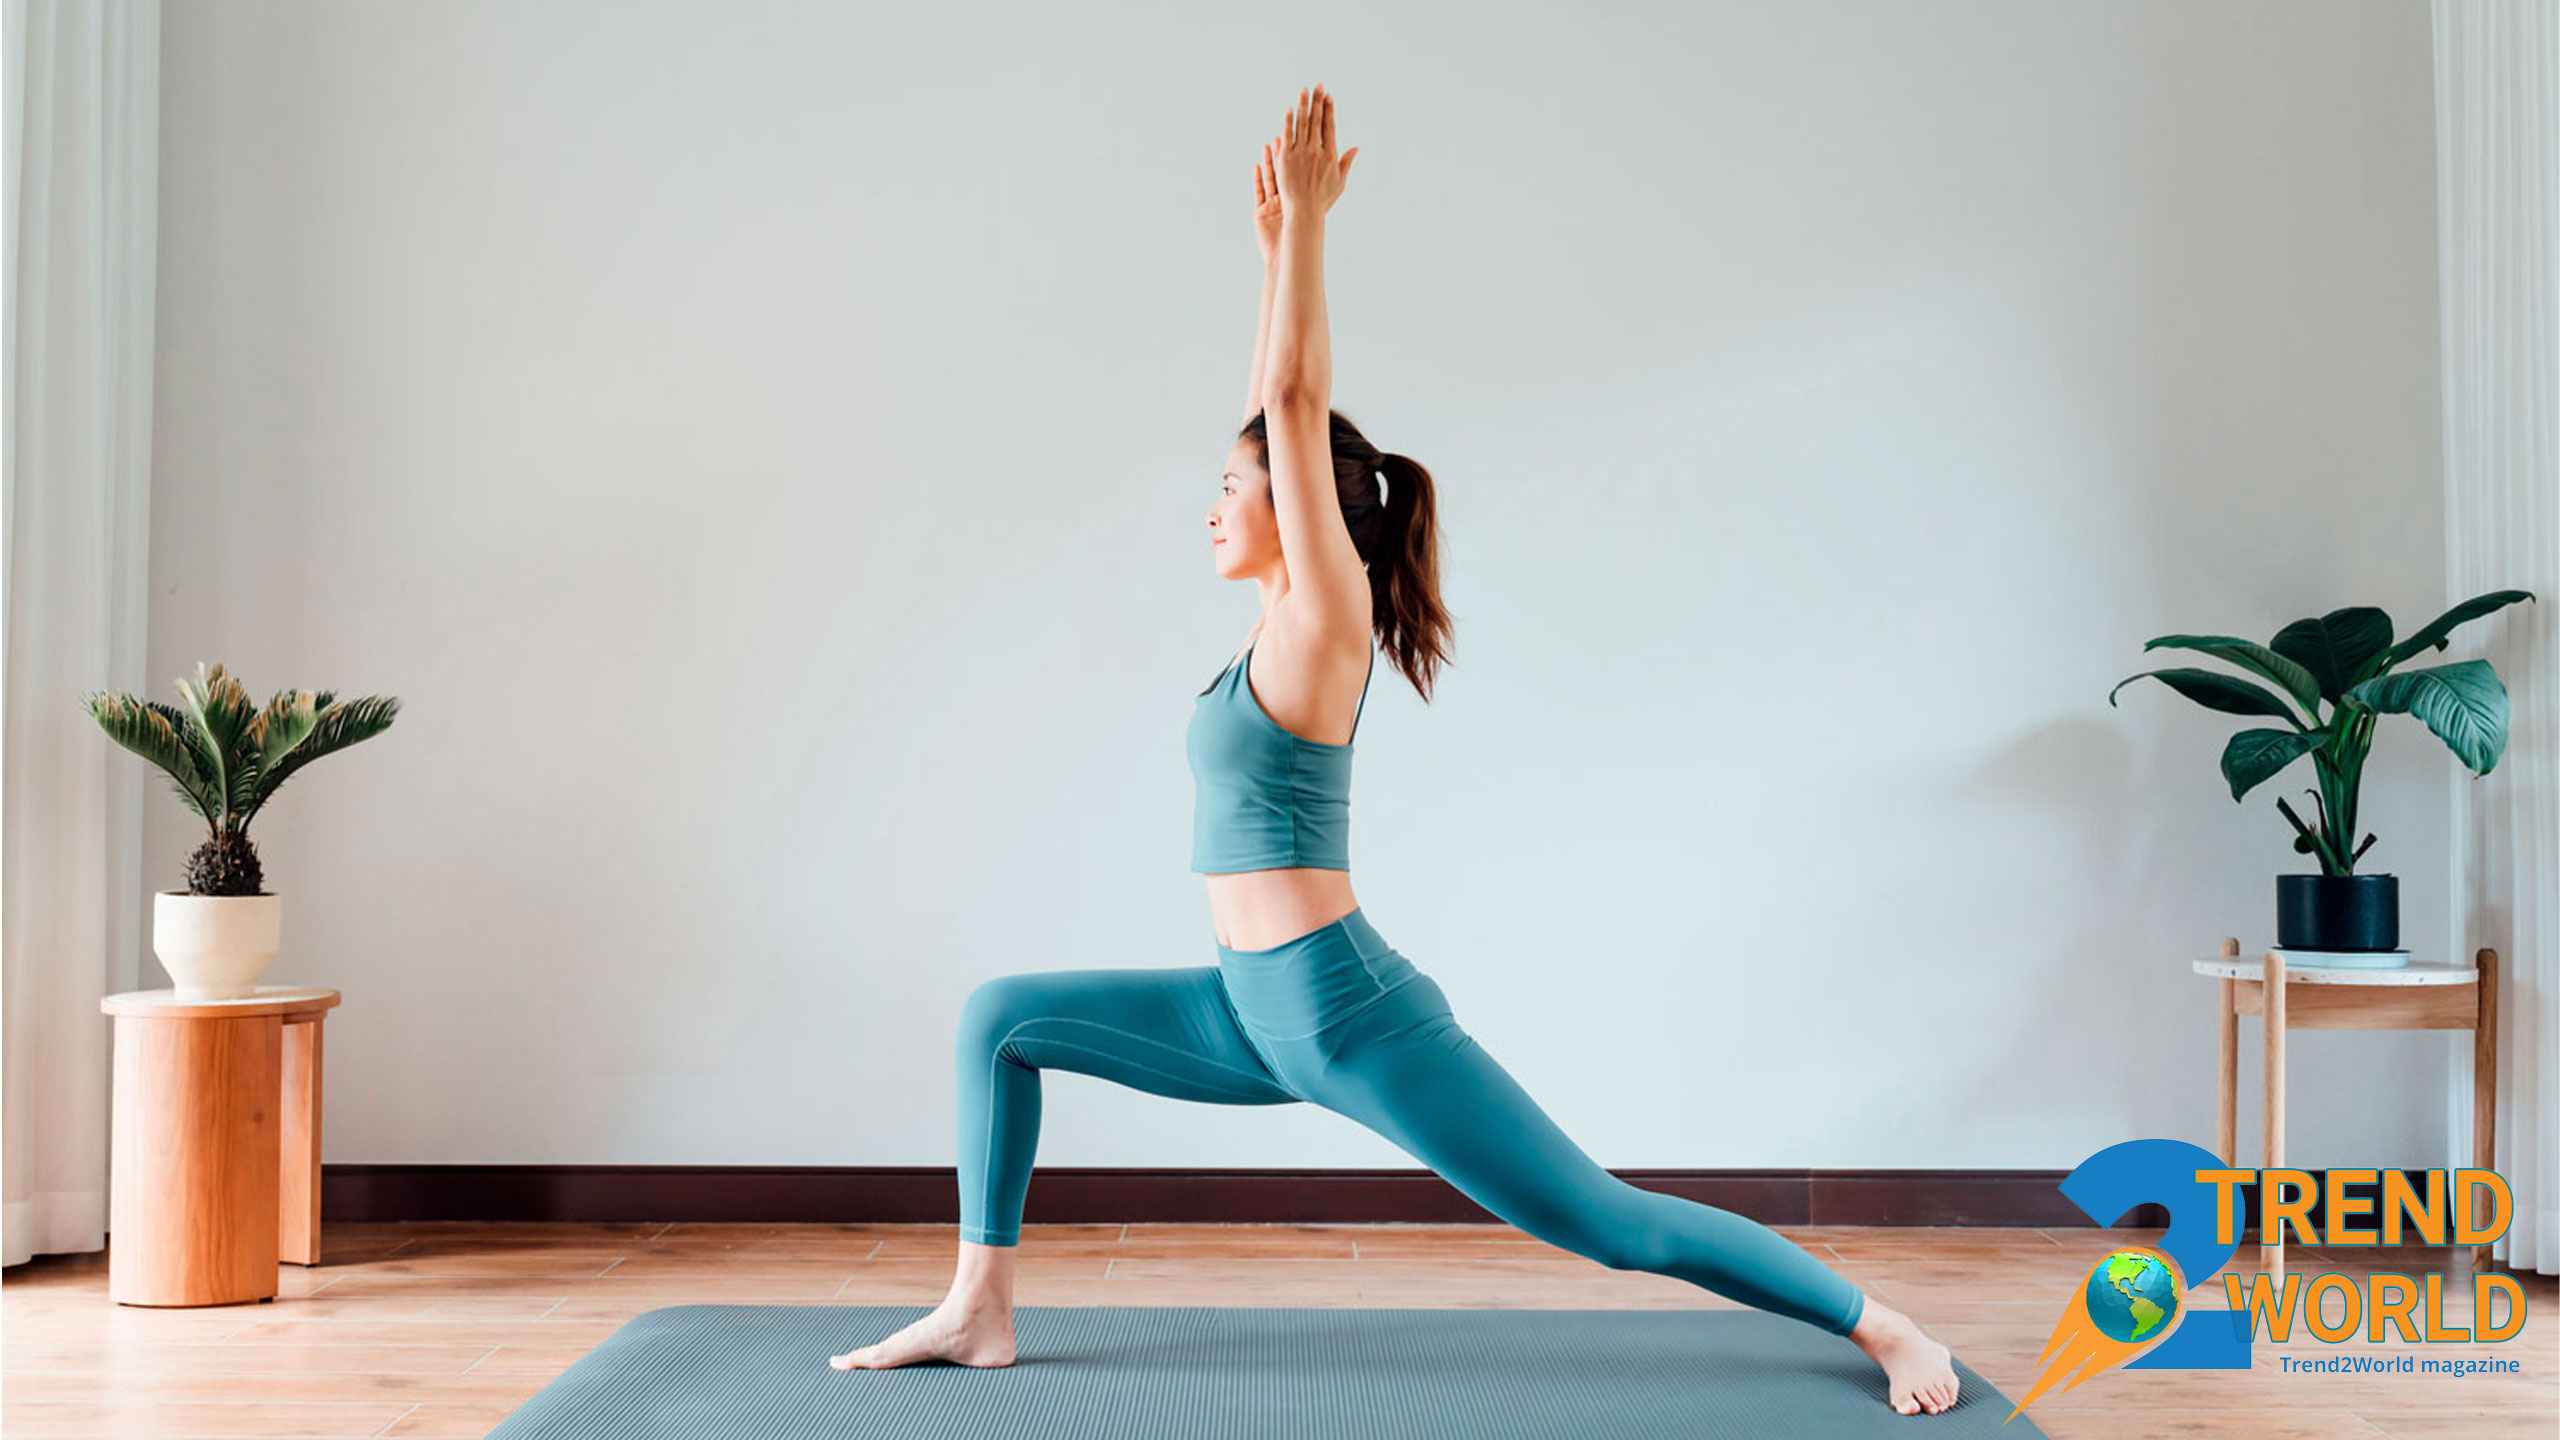
- Virabhadrasana
- Tadasana
- Vrikshasana
- Adho Mukha Svanasana
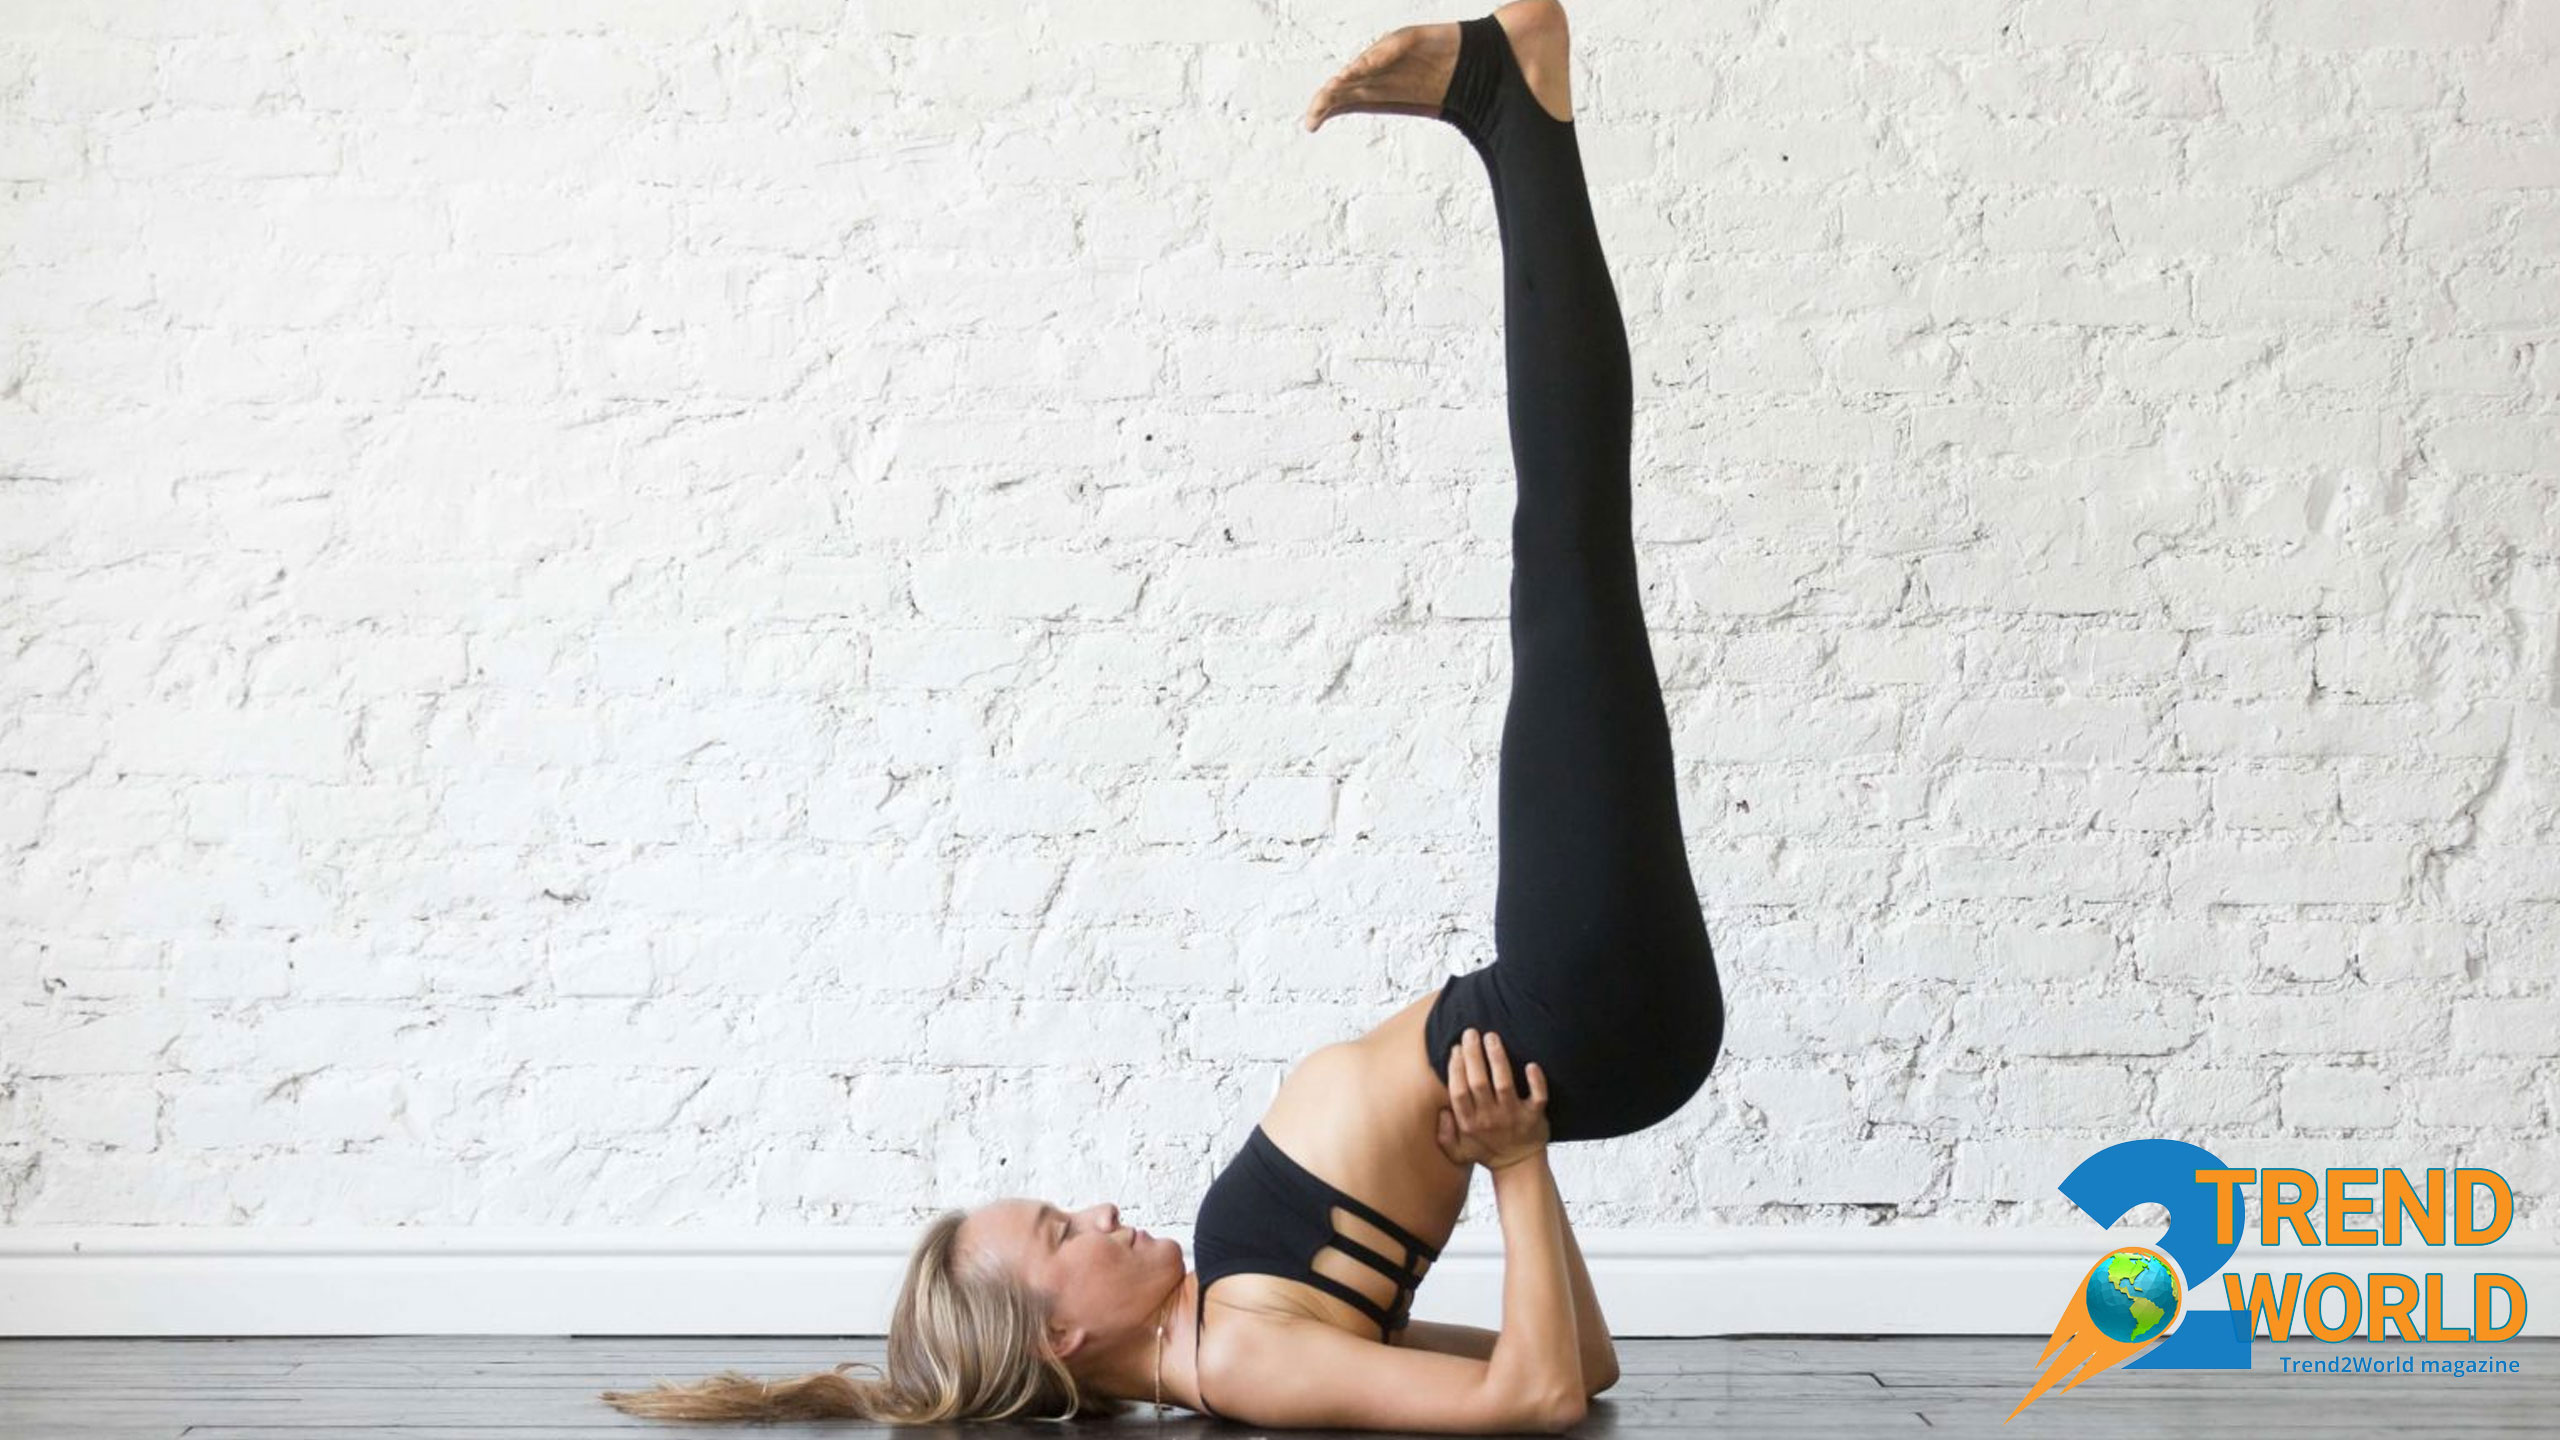
- Setu Bandhasana
- Viparita Karani
- Sukhasana
is an ancient method for maintaining physical and mental health, helping us achieve relaxation, reduce stress, and increase energy through various exercises.
Dual Impact on Body and Mind
One of the key features of yoga is that it simultaneously impacts both the body and the mind, making it one of the best ways to cope with the pressures of modern life.
Yoga as a Stress Reliever
In today’s world, where we are often overwhelmed with daily responsibilities, stress, and anxiety, yoga can serve as a useful tool for relieving tension and restoring energy.
Mental and Physical Strengthening
Yoga practices are designed not only to strengthen the body but also to free the mind from negative thoughts and anxieties.
Yoga for Daily Use
Therefore, many people use yoga to start their day with more energy or as a tool for relaxation at the end of the day.
Simple Yoga Poses for Stress Relief
that can help reduce stress and increase energy, and these exercises can be easily performed at home or at work.
Balasana:
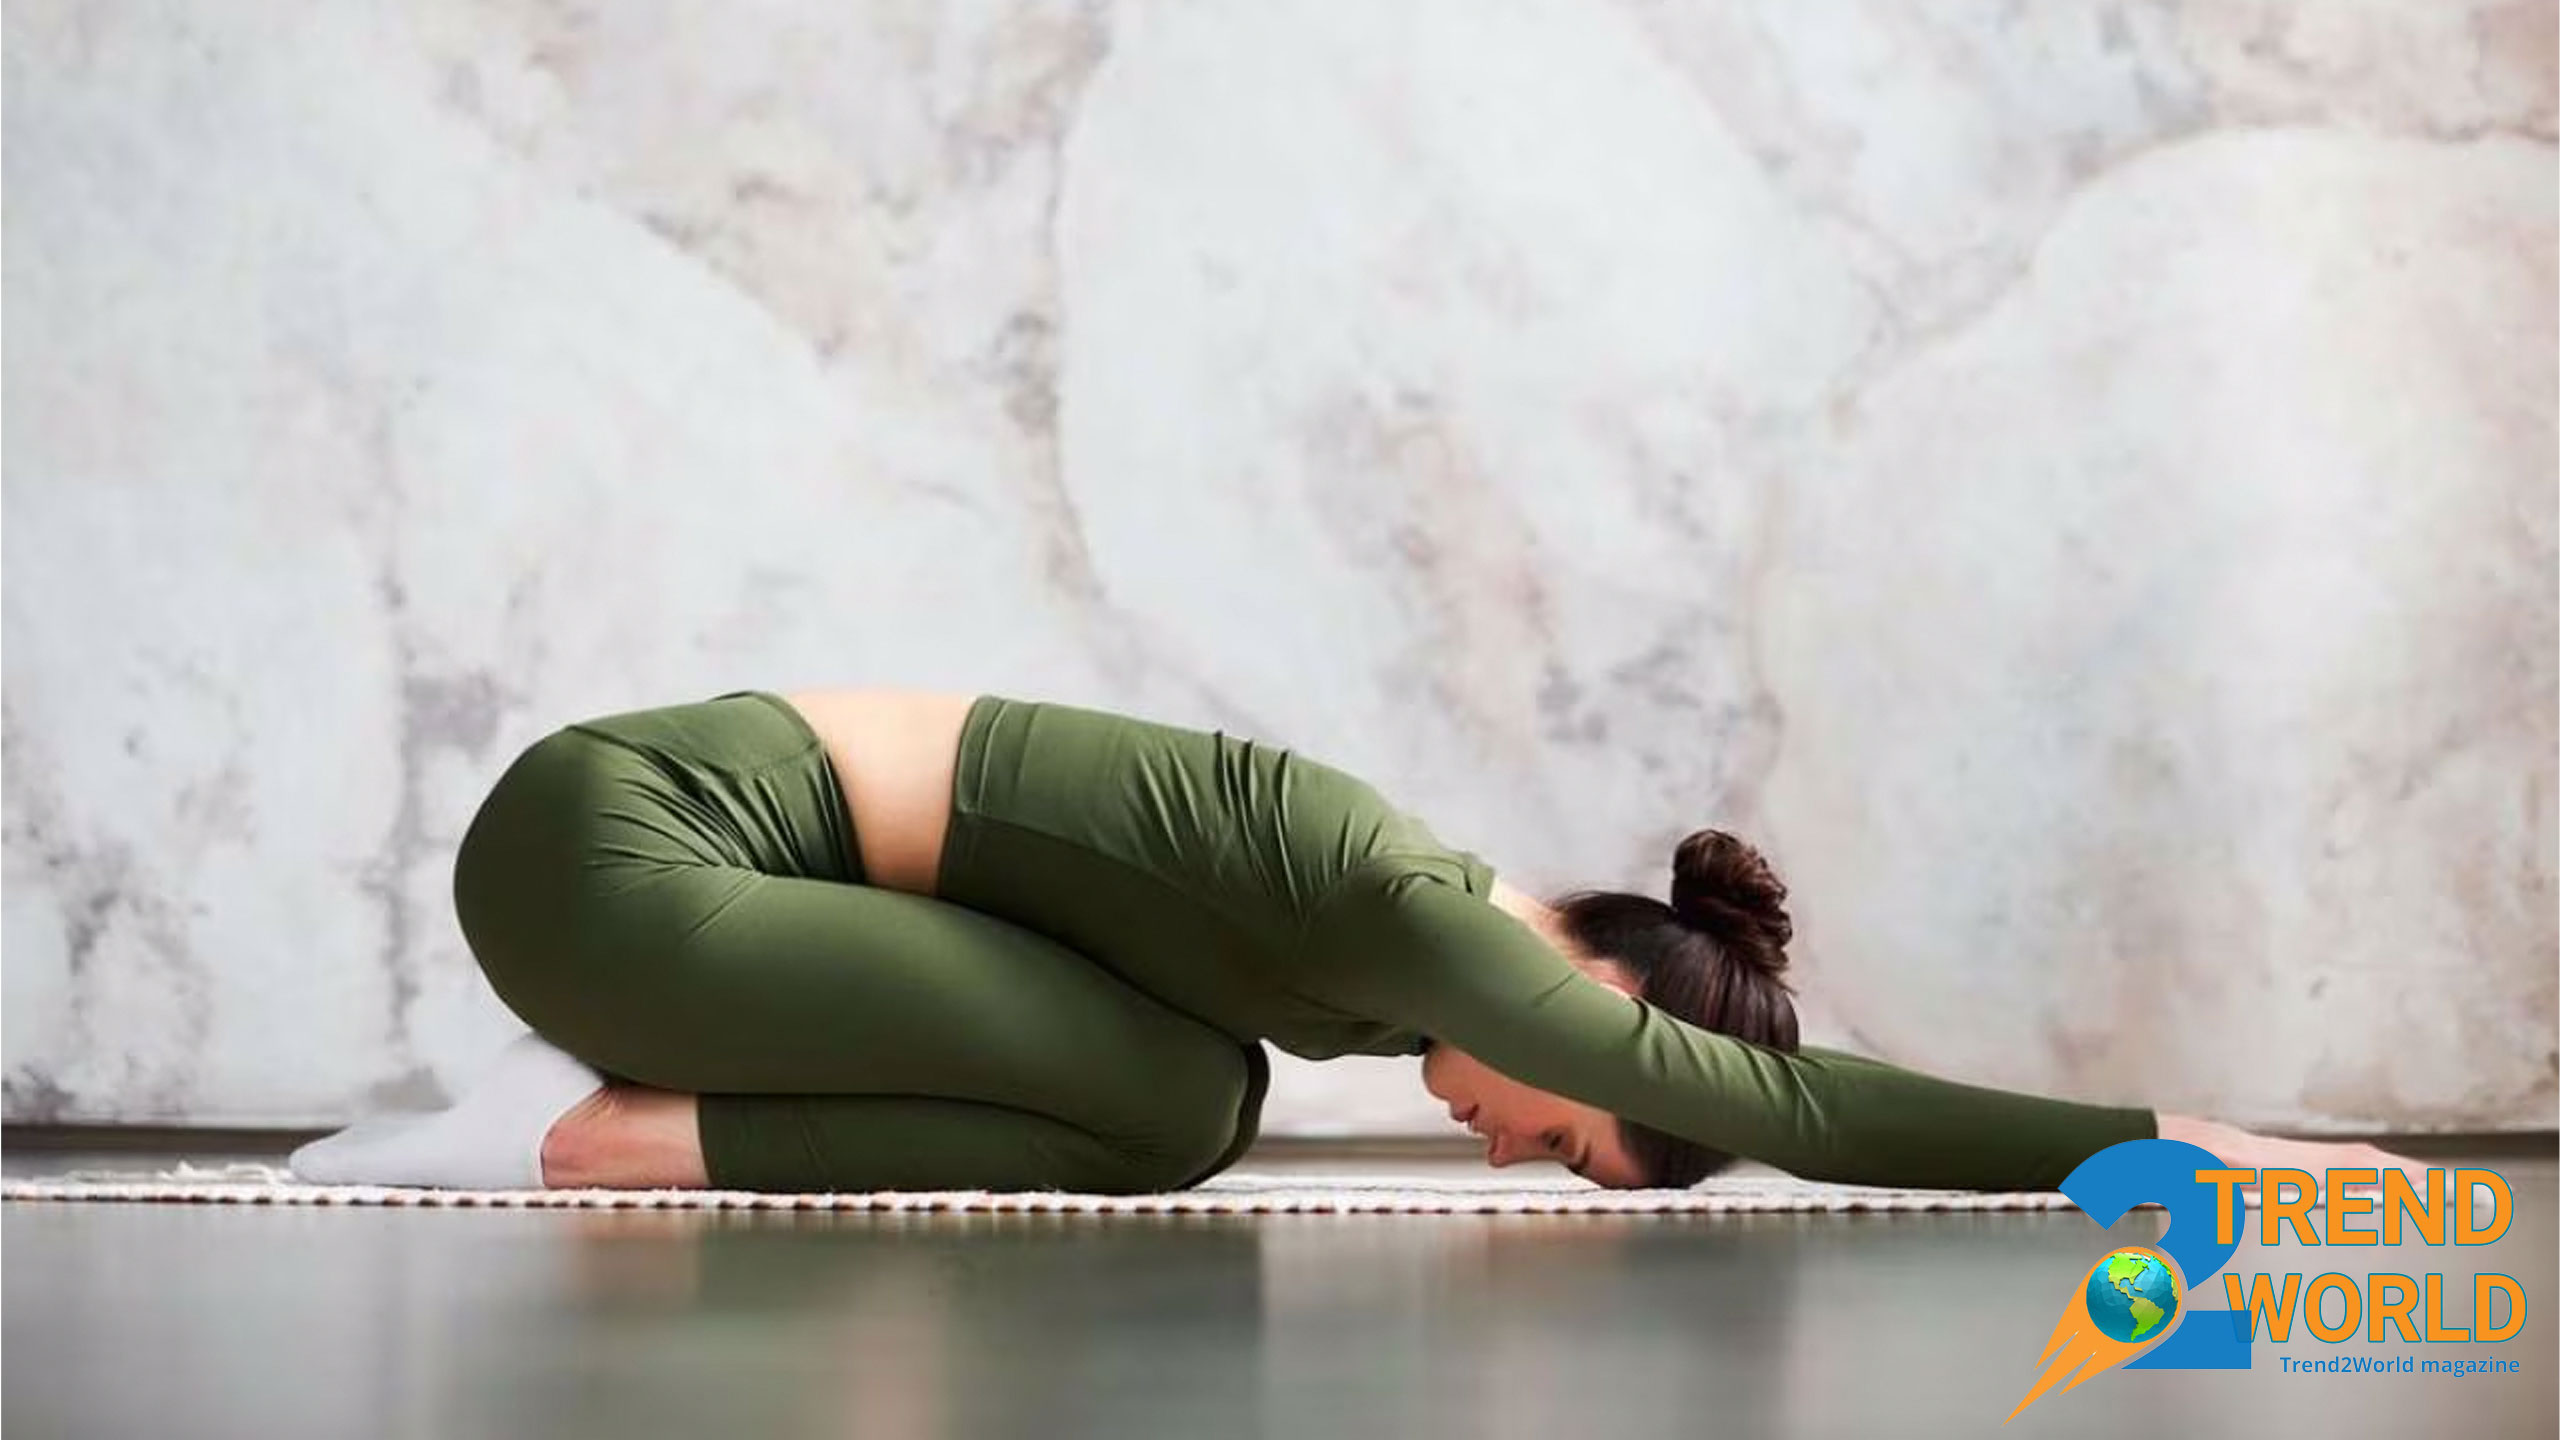
The Child’s Pose (known as “Balasana” in yoga) is one of the most calming and restorative postures in yoga, where the individual fully relaxes their body. This pose is mainly used for energy recovery and improving flexibility. Child’s Pose helps to release anxiety and stress, promoting inner peace and focus. It stretches the muscles of the back and neck, reducing physical tension. It also opens the hip area and stretches the muscles around the knees. The forward bend improves blood circulation throughout the body, making this pose highly beneficial when feeling tired or mentally pressured, helping to restore energy.
How to perform the Child’s Pose:
-
Starting Position
- Sit on your knees with them about hip-width apart.
- Position the heels of your feet under your hips without putting pressure on them.
- If this position feels uncomfortable, place a cushion or soft mat under your hips.
-
Moving Into the Pose
- Gently bend forward, bringing your forehead toward the floor or a mat.
- Place your arms in one of two ways:
- Stretch them forward, pressing your palms into the ground.
- Rest them alongside your body with palms facing upward.
- Ensure your body is completely relaxed.
-
Breathing and Relaxation
- Take deep, calm breaths to help your body relax.
- With each inhale, draw your belly toward the floor.
- With each exhale, allow your body to relax further.
- Focus on diaphragmatic breathing (breathing from the lower belly) for a full oxygen supply.
Tips for a Better Child’s Pose
- Knee Placement: Keep your knees sufficiently apart to avoid pressure in the pelvic or knee area. If you feel discomfort, create more space between them.
- Support for Knees: If your knees feel uncomfortable, place a cushion or extra mat under them.
- Lower Back Comfort: If you feel pain or tension in your lower back, bend forward slowly and with control to prevent injury.
- Slow Transitions: Move in and out of the pose slowly and mindfully. Use this time to focus on relaxation and breath control.
- Forehead Support: If your forehead doesn’t reach the ground, place a yoga block or pillow under your head.
- Neck Position: Keep your neck in a neutral position, aligned with your spine, rather than pulling it forward or backward.
- Using Props: If you struggle with this pose, yoga blocks, pillows, or soft cushions can provide extra comfort and support.
- Hold for Longer Benefits: Stay in the pose for a few minutes to maximize relaxation. Ensure you feel comfortable throughout.
- Mental Relaxation: Use this pose to clear your mind and reduce stress. Focusing on your breath can help you reach a deeper state of calm.
- Stress Relief: If you feel tense or anxious, allow yourself to fully relax into the pose, using deep breaths to release tension.
Why Child’s Pose is Beneficial
- Relieves stress and calms the nervous system.
- Provides gentle stretching for the back, hips, and legs.
- Enhances mental relaxation and focus.
- Serves as a resting pose at the end of a yoga session to prepare the body for deeper relaxation or meditation.
Marjaryasana-Bitilasana:
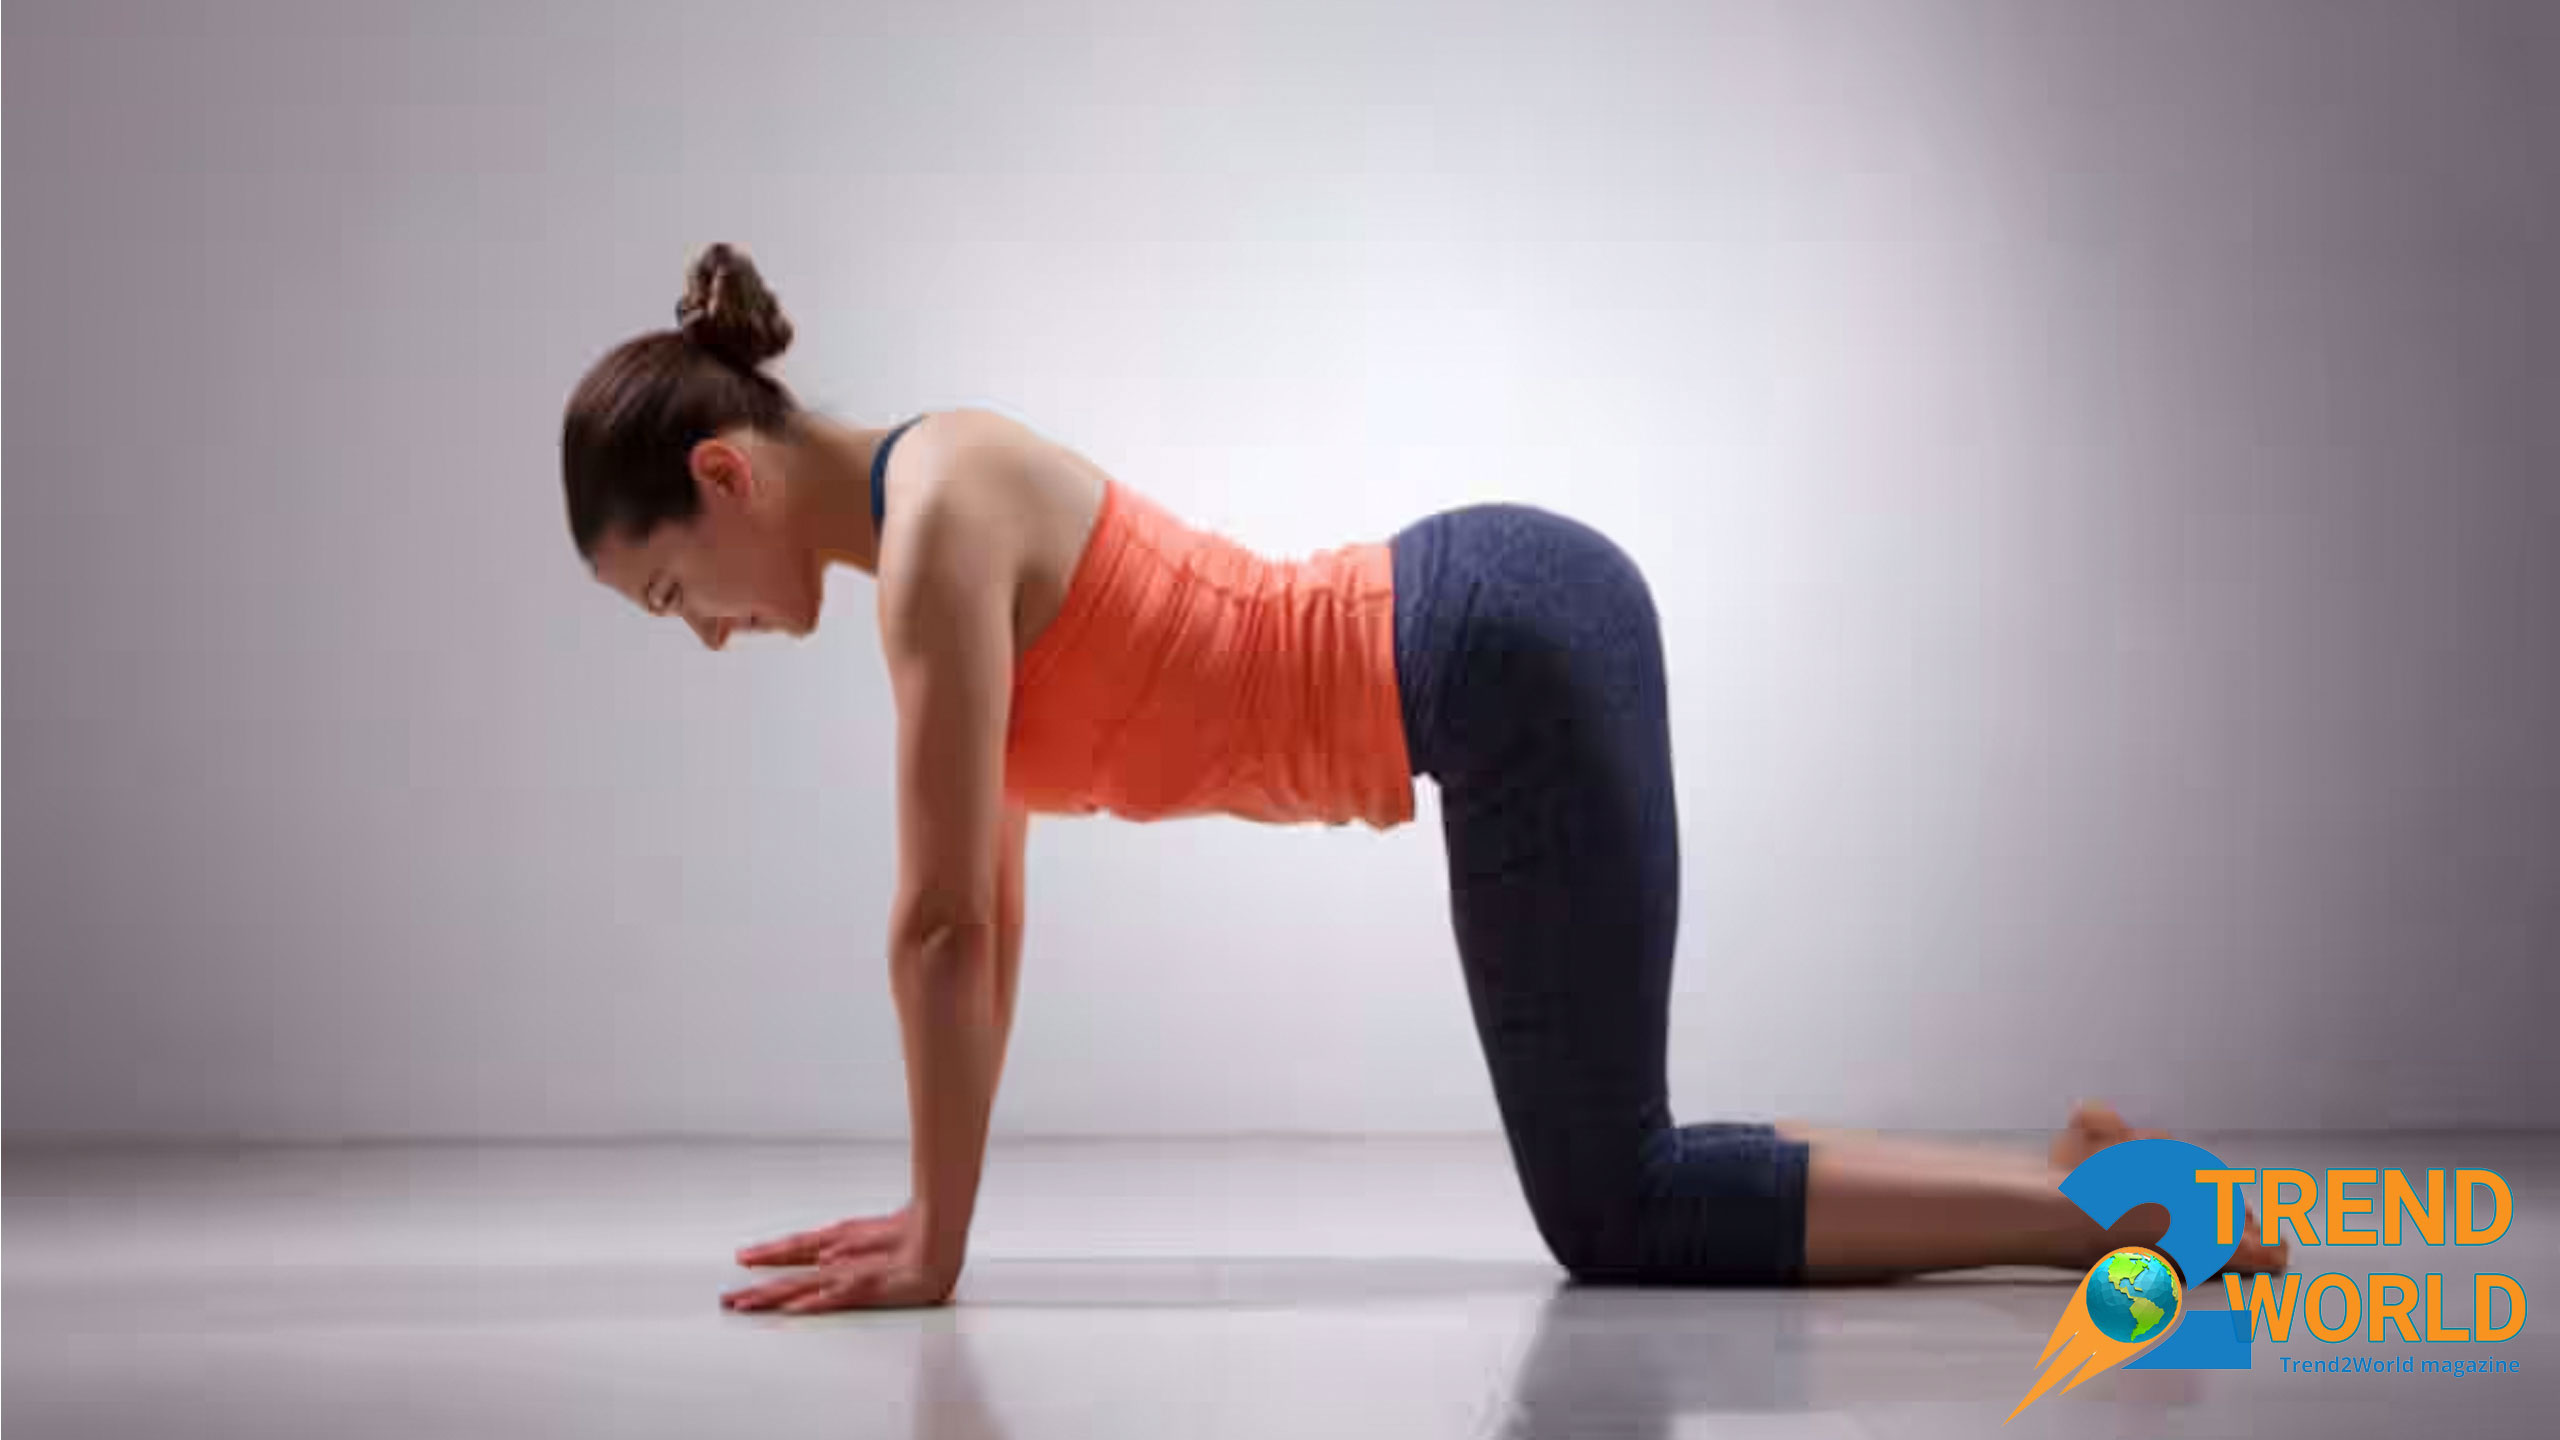
Introduction to the Cat-Cow Pose
The Cat-Cow pose (Marjaryasana-Bitilasana) is a fundamental and widely practiced yoga pose, often used as a warm-up in yoga sessions. This gentle movement stretches and strengthens the spine while improving flexibility and engaging the core muscles. The pose consists of two movements—Cat and Cow—which alternate between arching and rounding the back. This rhythmic motion promotes both strength and relaxation in the back, neck, shoulders, and abdomen.
Mental and Emotional Benefits
Beyond its physical benefits, the Cat-Cow pose also has a calming effect on the mind. By helping to release tension and anxiety, it encourages mindfulness and stress relief. This makes it a valuable tool for both physical and mental well-being.
Impact on the Spine and Posture
One of the greatest advantages of the Cat-Cow pose is its positive impact on the spine. Many people experience back, neck, and shoulder discomfort due to prolonged sitting and a sedentary lifestyle. This pose helps stimulate and strengthen the muscles around the spine, improving posture and reducing stiffness.
Breathing and Circulation Benefits
Since the Cat-Cow pose is performed in sync with deep, mindful breathing, it enhances lung capacity and supports the respiratory system. Proper execution of the movement can boost energy levels, improve circulation, and reduce the risk of injury in more advanced yoga practices.
Accessibility and Practicality
The simplicity and effectiveness of the Cat-Cow pose make it suitable for both beginners and experienced yoga practitioners. It can be performed anywhere with enough space for movement, making it an accessible and practical addition to any routine.
Conclusion: A Holistic Yoga Pose
Overall, this pose improves flexibility, posture, and muscle strength while also providing relief for those with chronic back or neck pain. It is an excellent addition to any yoga practice for both physical and mental well-being.
How to do the Cat-Cow Pose (Marjaryasana-Bitilasana):
The Cat-Cow pose is a gentle flow between two yoga postures that helps improve flexibility, strengthen the spine, and promote better body control. This movement also prevents injuries by maintaining proper alignment and coordination.
Getting Into Position
Start in a tabletop position:
- Place your hands directly under your shoulders, fingers spread wide for even pressure distribution.
- Position your knees under your hips, ensuring they are aligned.
- Keep your spine neutral—neither overly arched nor rounded.
- Press your toes lightly into the ground without fully extending your feet.
- Align your neck with your spine, gently tucking your chin toward your chest to avoid strain.
- Breathe deeply and calmly as you settle into this posture.
Cow Pose (Bitilasana)
- Inhale deeply.
- Let your chest move forward as your shoulders pull back and down.
- Allow your abdomen to drop toward the floor, naturally arching your lower back.
- Lift your head and gaze upward, opening your throat and chest.
- Shift your pelvis upward and forward to deepen the curve in your lower back.
- Feel the gentle stretch through your abdomen, chest, and lower back.
Cat Pose (Marjaryasana)
- Exhale slowly.
- Draw your chin to your chest, engaging your abdominal muscles.
- Round your spine upward, forming an arch in your back.
- Lower your head and neck, bringing your gaze toward your legs or feet.
- Shift your pelvis downward and backward, encouraging your abdomen to draw inward.
- Feel the stretch in your back, neck, and abdominal muscles, relieving tension.
Repeating the Movement
- Inhale into Cow Pose, letting your chest move forward and your abdomen drop.
- Exhale into Cat Pose, rounding your spine upward and pulling your abdomen in.
- Flow smoothly between the two movements, keeping them slow and controlled.
- Repeat 5 to 10 times, focusing on synchronizing your breath with each movement.
Ending the Pose
- After your final repetition, return to tabletop position and pause for a few moments.
- Take slow, steady breaths to allow your body to recalibrate.
- If you need extra relaxation, transition into Child’s Pose (Balasana):
- Spread your knees apart.
- Extend your arms forward.
- Rest your forehead on the floor for a deep stretch and full-body relaxation.
By practicing Cat-Cow regularly, you’ll enhance spinal flexibility, reduce tension, and promote overall well-being.
Trikonasana:
1. Introduction to Trikonasana
Trikonasana, also known as Triangle Pose, is a fundamental yoga posture that strengthens the body while promoting mental and emotional well-being. It is widely practiced in yoga sessions due to its ability to improve flexibility, balance, and muscle strength. This pose engages multiple muscle groups, including the legs, back, abdomen, shoulders, and neck, making it a comprehensive exercise for the entire body.
2. Physical Benefits of Trikonasana
In Trikonasana, the body forms a triangular shape, creating a deep stretch from the legs to the arms. This movement enhances blood circulation and allows energy to flow more freely throughout the body. Beyond its physical benefits, the pose also promotes relaxation and stress relief by encouraging deep breathing and focus. When performed correctly, it can help relieve joint discomfort, reduce shoulder and back pain, and counteract the negative effects of prolonged sitting or repetitive movements.
3. Posture and Flexibility Enhancement
Additionally, Trikonasana opens the chest, stretches the pelvic region, and improves posture. It is especially beneficial for individuals with chronic back and neck pain. Another key advantage of this pose is its impact on concentration and mental relaxation. By focusing on breath control and body alignment, practitioners can reduce anxiety and stress, fostering a sense of inner calm.
4. Holistic Benefits and Conclusion
Ultimately, Trikonasana is more than just a physical stretch—it is a holistic practice that nurtures both the body and mind. Regular practice can lead to improved strength, flexibility, and overall well-being, making it an excellent addition to any yoga routine.
How to perform the Triangle Pose (Trikonasana):
Start in Mountain Pose (Tadasana)
- Stand tall with your feet about shoulder-width apart.
- Keep your body completely straight and upright.
- Distribute your weight evenly on both feet—avoid putting pressure on one side.
- Extend your arms horizontally, parallel to your shoulders, with palms facing downward.
- Keep your neck elongated, shoulders pulled back, and core slightly engaged.
- Maintain a straight lower back and proper alignment throughout the pose.
Position Your Feet
- Step your feet wide apart—about a meter or more, depending on your height.
- Turn your right foot 90 degrees outward so your toes point forward.
- Slightly turn your left foot inward (about 15–20 degrees).
- Keep your knees slightly bent to avoid strain and maintain flexibility.
Align Your Body
- Keep your spine straight—do not lean forward or backward.
- Pull your shoulders back and down to create space for better breathing.
- Extend your arms fully, parallel to the floor, and stretch your fingers outward.
Move Into the Pose
- Take a deep breath and rotate your torso to the right from your waist.
- Bend your torso toward the right, leading from the hip joint (not the lower back).
- Keep your feet grounded and avoid twisting your body.
- Lower your right hand toward your right leg.
- If possible, place your hand on your ankle.
- If that’s difficult, rest it on your shin or thigh.
- Stretch your left arm straight upward, aligning it with your right arm.
Hold the Pose
- Turn your head upward and look at your left hand.
- Keep your body firm but relaxed—don’t strain your muscles.
- Take deep, steady breaths and hold the position for 30 seconds to 1 minute.
- Focus on the stretch along your sides and groin without forcing your body.
Return to the Starting Position
- Slowly bring your right hand back up and return your torso to an upright position.
- Bring your feet back to shoulder-width apart.
- Place your arms alongside your body and take a deep breath.
Repeat on the Other Side
- Turn your left foot outward.
- Bend your torso toward the left and follow the same steps.
By following these steps, you can perform the Triangle Pose effectively while maintaining proper form and avoiding unnecessary strain. Enjoy the stretch and focus on your breathing!
Virabhadrasana:
Introduction to the Warrior Pose
The Warrior Pose (Virabhadrasana) is one of the most well-known and powerful yoga asanas, offering both physical and mental benefits. This pose symbolizes strength, courage, and resilience, drawing inspiration from the legendary warrior Virabhadra in Hindu mythology. According to ancient stories, Virabhadra was a fearless fighter who entered battle to overcome challenges and adversity. Similarly, this pose not only strengthens the body but also encourages practitioners to face life’s difficulties with confidence and determination.
Physical Benefits of the Warrior Pose
The Warrior Pose is a dynamic practice that enhances endurance, balance, flexibility, and concentration. It requires practitioners to engage their muscles while maintaining inner calm and focus through proper breathing. This posture is especially beneficial for strengthening the legs, hips, and abdomen while also improving posture and stability. Additionally, it helps stretch the chest, shoulders, and back, reducing tension and increasing flexibility.
Mental and Emotional Benefits
Beyond its physical benefits, the Warrior Pose is a powerful tool for mental clarity and emotional resilience. Regular practice enhances focus and inner peace, helping individuals remain steady and composed even in stressful situations. By promoting a sense of confidence and empowerment, this asana is not just about physical strength—it also nurtures mental fortitude and self-assurance, making it a valuable practice for both body and mind.
How to do the Warrior Pose (Virabhadrasana):
Start in Tadasana (Mountain Pose):
- Stand tall with your feet hip-width apart and your body weight evenly distributed between both feet.
- Place your arms alongside your body, and gently draw your shoulders down and back to open your chest.
- Ensure your body is elongated, with your head and neck aligned with your spine, and your gaze forward.
Step Forward:
- Take a large step forward with your right foot, creating a distance of 3 to 4 feet between your right and left feet.
- Bend your right knee to a 90-degree angle, ensuring your right knee is directly above your right ankle.
- Be mindful that your knee doesn’t go beyond your toes to avoid strain on the knee joint and maintain stability.
- Keep your left leg straight and extended back. Press the heel of your left foot down, ensuring the entire sole of your left foot is grounded. Your left knee should remain straight.
Raise Your Arms:
- Gently raise your arms from your sides, keeping your fingers together.
- Extend your arms alongside your ears, drawing your shoulders back and opening your chest to elongate your upper body.
- Focus on lifting your arms for strength and stretch in your shoulders and arms.
Align Your Neck and Gaze:
- Keep your neck aligned with your spine, and make sure your head is in a natural line with your body.
- Direct your gaze toward your extended arms. If comfortable, you can look up towards the ceiling or above your hands.
Breath and Hold:
- Breathe deeply and evenly throughout the pose. Let your breath be calm and controlled, releasing any tension in your body.
- Hold the pose for 30 seconds to 1 minute, ensuring your body remains straight and stable. Engage the muscles in your lower body to help you stay grounded.
Return to Tadasana:
- When ready, gently lower your arms and step back with your right foot to return to the standing position (Tadasana).
- Take a moment to rest, breathe deeply, and gather your energy.
Repeat on the Left Side:
- Repeat the steps, starting with your left foot, to enhance balance and coordination in your body and enjoy the full benefits of this pose.
Tadasana:

Introduction to Tadasana
Tadasana (Mountain Pose) is a foundational and important asana in yoga, teaching key principles that are essential for practice. While it may appear simple at first, performing Tadasana correctly requires attention to body alignment, breathing, and posture.
Physical Benefits
As a basic standing pose, Tadasana helps strengthen posture, improve balance, and promote coordination throughout the body. It also raises awareness of how the body parts are positioned and move. In this pose, the spine is aligned vertically and straight, while the muscles in the legs, abdomen, and lower back are gently engaged, helping to stabilize and strengthen these areas.
Mental and Emotional Benefits
Beyond its physical benefits, Tadasana also has a positive impact on the mind and spirit. By focusing on proper alignment and breath, it can reduce mental tension and foster a sense of calm.
Role in Yoga Practice
In many yoga practices, Tadasana is used as a starting point, as it prepares the body for more complex movements by aligning it correctly. It also improves the flow of energy and enhances respiratory function, leaving the body feeling lighter and more refreshed.
Significance for All Practitioners
Although it may seem simple, Tadasana is a powerful tool for both beginners and experienced practitioners. It helps with body alignment, relaxation, and mental focus, making it an essential part of yoga practice.
How to perform the Mountain Pose (Tadasana):
Introduction to Tadasana (Mountain Pose)
To perform Tadasana (Mountain Pose) correctly, start by standing on a flat, stable surface with your body aligned vertically. Place your feet about hip-width apart, or slightly wider if more comfortable. Ensure your toes point forward and your heels are aligned with them. Keep both feet firmly grounded, with no part of the soles lifted. Press your heels together to distribute the energy evenly across your feet, while your toes should be slightly spread and in contact with the floor.
Grounding and Weight Distribution
Once your feet are stable, shift your focus to the distribution of your body weight. Evenly distribute your weight between both feet. Feel the energy transferring from the four corners of your feet—your heels, big and little toes, and the middle of your feet—into the earth, grounding your body and ensuring your center of gravity is centered. Your feet should feel strong and stable.
Spine Alignment
Next, bring your awareness to your spine. Imagine an invisible string pulling you upward from the crown of your head, elongating your spine. Stretch from your feet all the way up to the top of your head. Keep your neck and lower back in their natural positions, avoiding excessive arching in either direction. Gently draw your belly button inward to prevent excessive curvature in your lower back, while engaging your abdominal muscles.
Shoulder and Arm Positioning
Now, focus on your shoulders and arms. Draw your shoulders down and back to release any tension in your neck and shoulders. Keep your shoulders relaxed in their natural position, without raising them. Let your arms hang naturally at your sides, with your palms facing your body and fingers pointing downward. This allows your arms to remain relaxed and tension-free.
Head and Neck Positioning
Move your attention to your head and neck. Your head should sit naturally on your neck, neither tilted up nor down. Slightly tuck your chin to align your head and neck in a straight line, preventing strain on your spine. Keep your gaze forward, and if more comfortable, you can close your eyes or keep them half-closed. Relax your face and remove any tension in the facial muscles.
Breath Awareness
Now, focus on your breath. Breathe deeply and calmly, filling your lungs completely, and then exhaling slowly. With each breath, feel your body lengthening and stretching. Allow each breath to bring fresh energy into your body, making you feel lighter and more relaxed. Deep breathing enhances your focus and awareness, helping you release both physical and mental tension.
Final Posture and Relaxation
In this pose, all your muscles should remain relaxed, yet your body should feel stretched and engaged. You should feel lengthened from the tips of your toes to the top of your head, with your core balanced. Stay in this position for a few moments, keeping your attention on your body and breath. As your body and mind relax and focus, you’ll experience greater stability and harmony.
Conclusion and Benefits
Take a few moments of peace and mindfulness in this posture, allowing both your body and mind to become balanced and aligned. This will leave you feeling refreshed and energized.
Adho Mukha Svanasana:
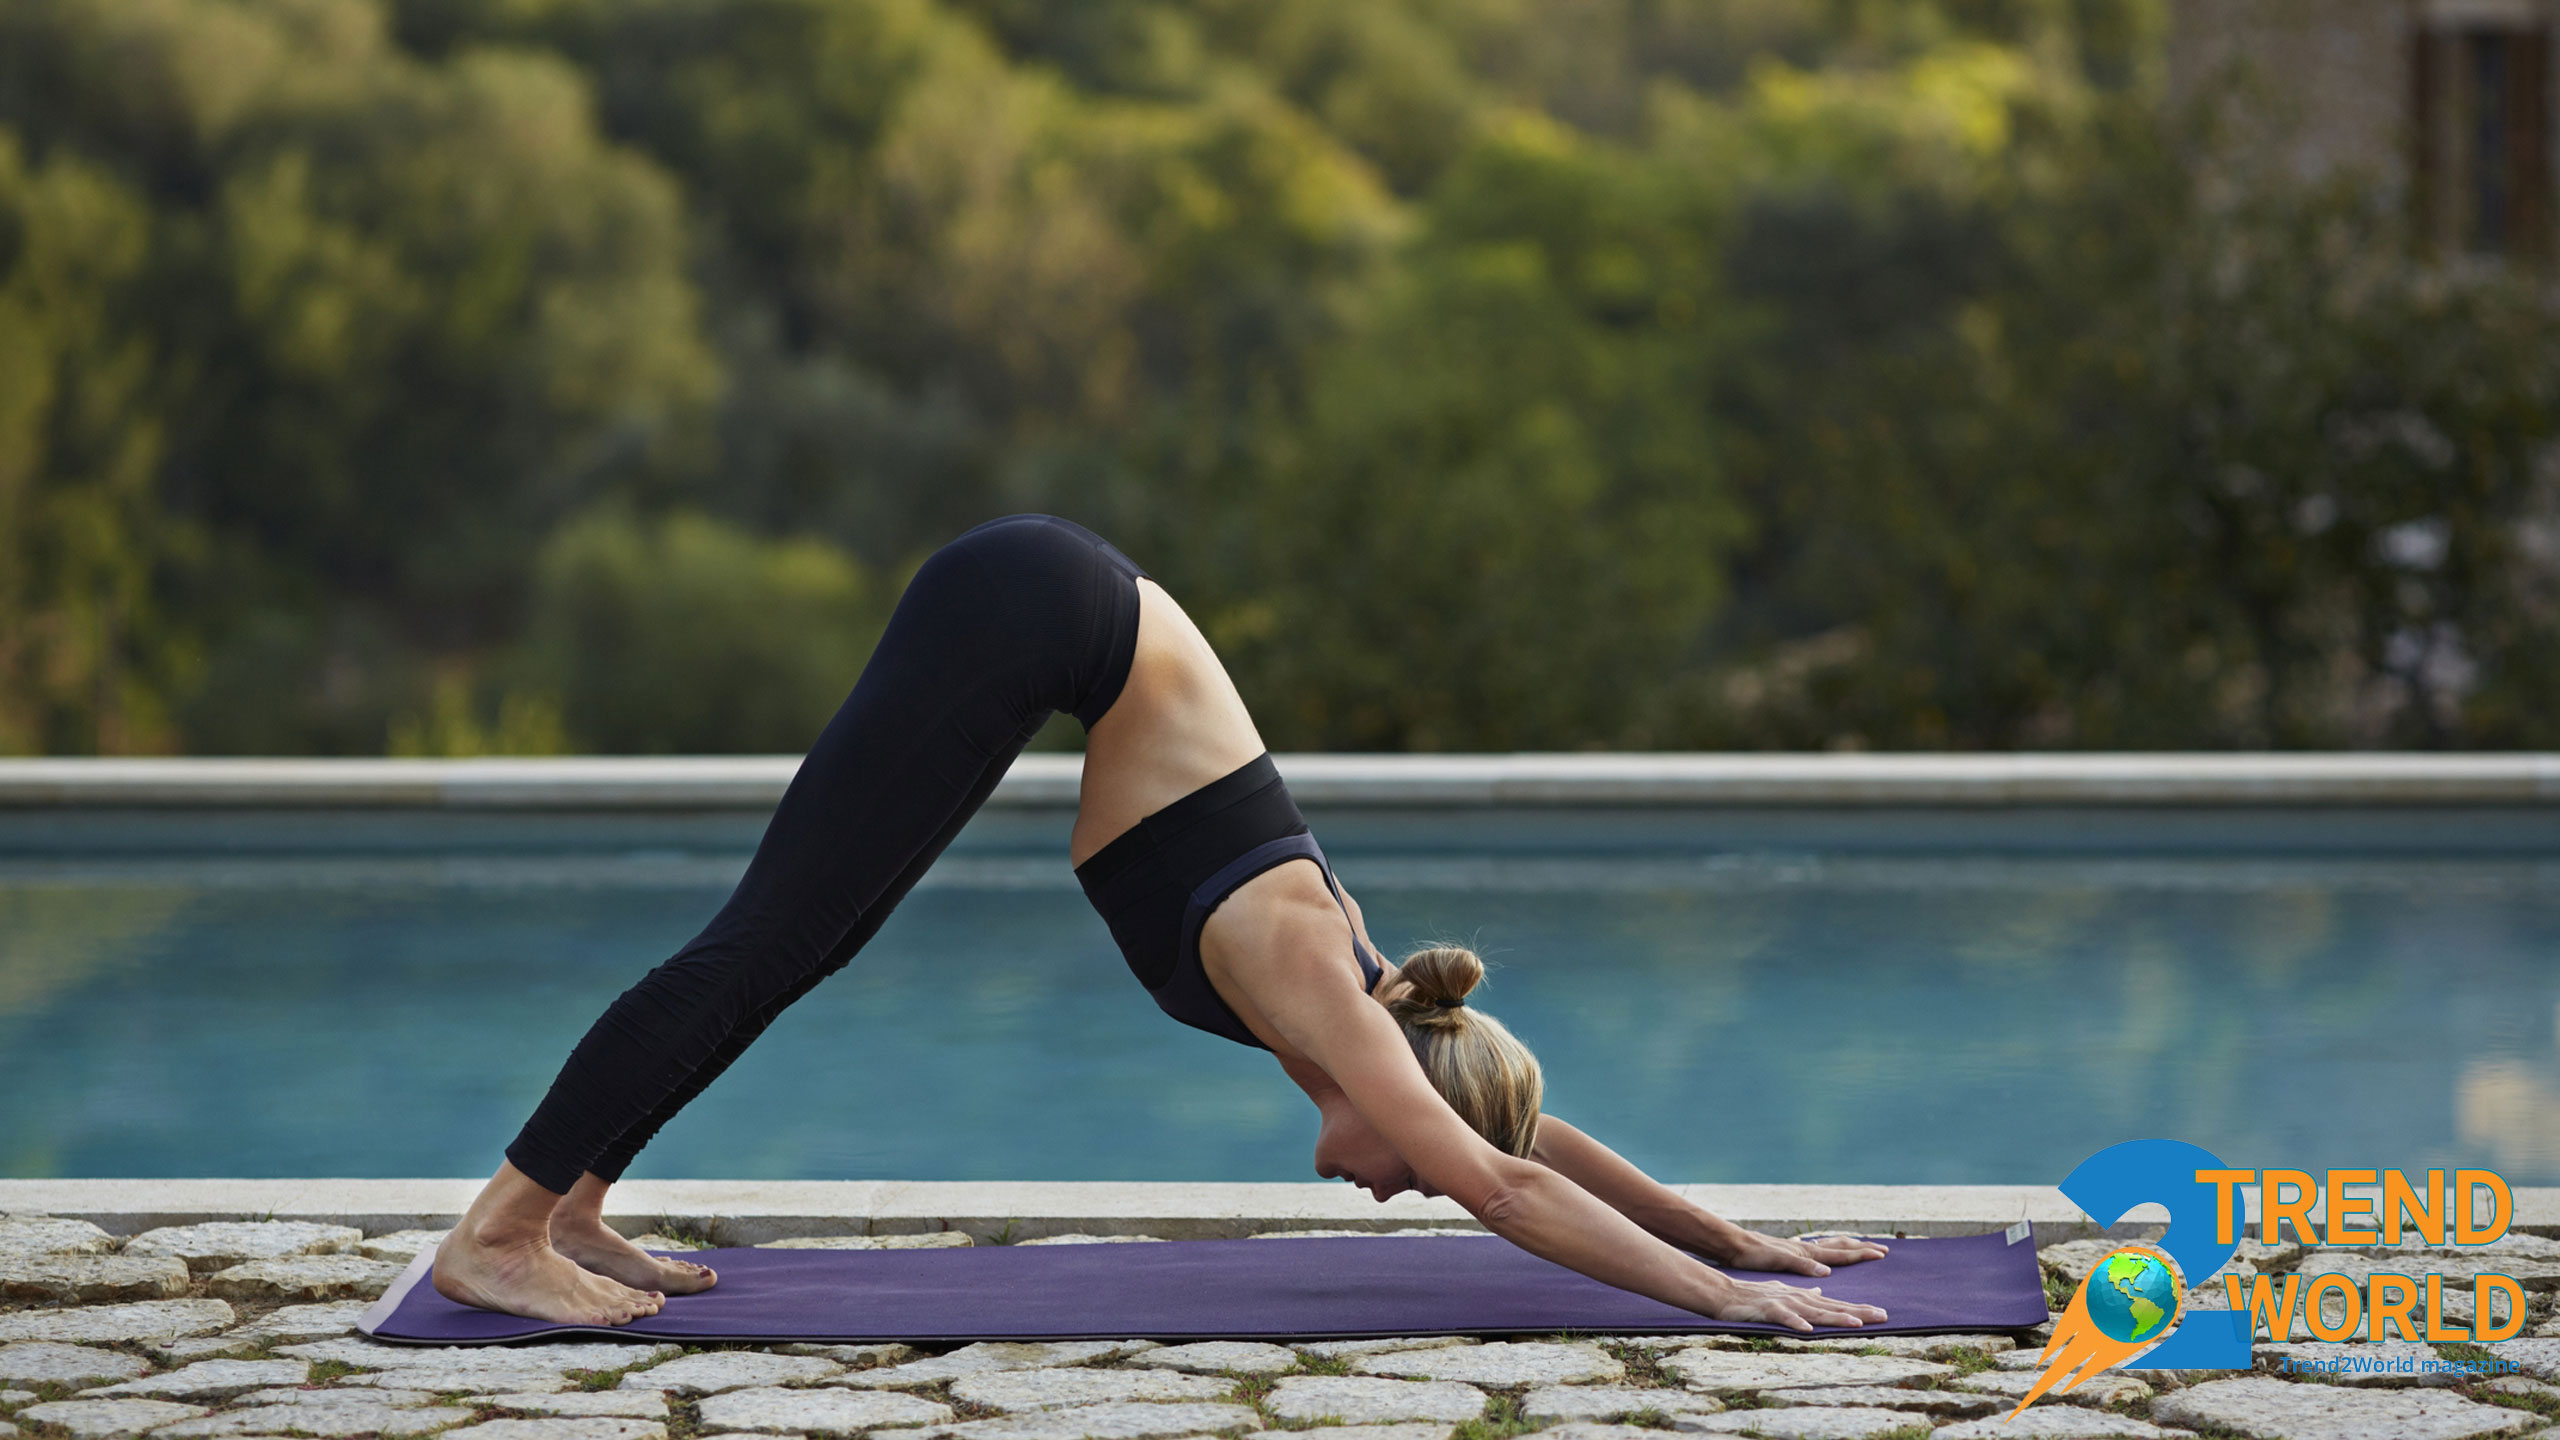
Introduction to the Pose
The Downward-Facing Dog (Adho Mukha Svanasana) is one of the most well-known and foundational poses in yoga. It’s used in various styles and is beneficial for practitioners at all levels, from beginners to advanced. This pose combines strengthening, stretching, and recovery, offering a wide range of physical and mental benefits.
Physical Benefits
Physically, the Downward-Facing Dog strengthens the back, legs, shoulders, and arms while also improving overall flexibility. It also promotes better blood circulation by directing blood toward the head and brain, which can boost energy and vitality.
Mental and Emotional Benefits
But the benefits of this pose go beyond the physical. The Downward-Facing Dog has a calming effect on the mind. It encourages focus on the breath, helping to release stress and clear away anxious thoughts. By practicing conscious breathing, this pose allows practitioners to stay in the present moment, making it easier to let go of negativity and distractions. For this reason, it is often included in daily yoga routines to promote both mental and physical balance.
Restorative and Transitional Benefits
In addition to being restorative and relaxing, the Downward-Facing Dog gives the body a chance to recover and release tension built up from daily stresses. It also serves as a transitional pose, allowing a smooth flow into other movements like Bird or Warrior poses.
Conclusion
As both a standalone posture and a key part of yoga sequences, the Downward-Facing Dog strengthens the body, improves flexibility, and enhances the coordination of mind and body.
Our recommended product for you to have the best yoga experience – click on the image below!
How to perform the Downward-Facing Dog pose (Adho Mukha Svanasana):
Preparation and Setup
- Starting Position: Sit on the floor, transitioning into a tabletop position on hands and knees.
- Hand Placement: Hands should be shoulder-width apart, fingers spread wide to create surface contact.
- Knee Position: Knees should be directly under the hips, with the distance between them equal to hip width.
- Neck and Spine Alignment: Keep the neck neutral and spine aligned vertically.
Transition into the Pose
- Raising the Hips: Gradually begin to push your hips upward and back, forming an upside-down “V” shape.
- Spine Alignment: Maintain a flat, elongated back as your hips rise, avoiding rounding or arching the spine.
Leg Position and Stretch
- Leg Straightening: Begin to straighten the legs gradually. Keep knees slightly bent if needed to feel the stretch in your hamstrings.
- Heels and Grounding: Press heels toward the floor, even if they don’t reach the ground. Focus on stretching and strengthening your legs.
Arm and Shoulder Alignment
- Arm Position: Keep arms straight, palms pressed into the floor for stability.
- Finger Placement: Spread fingers wide, transferring pressure through fingertips and wrists.
- Shoulder Placement: Ensure shoulders stay away from the ears and direct towards the hips to deepen the stretch.
Neck and Head Alignment
- Neck Position: Keep your neck naturally aligned with the spine, without excessive tension.
- Gaze: Your face should be directed towards your thighs or legs, with the possibility of gazing toward your navel for comfort.
Breathing and Duration
- Breathing: Maintain deep, calm breaths, inhaling and exhaling fully with each stretch.
- Pose Duration: Hold for 5 to 10 breaths based on comfort and experience.
Exiting the Pose
- Returning to Tabletop: Gently lower your knees back to the ground and transition to the tabletop position slowly and controlled.
- After the Pose: You may continue with other poses or rest as needed.
Vrikshasana:

1. Introduction to Tree Pose
The Tree Pose (Vrikshasana) is one of the most popular and symbolic asanas in yoga, which holds special significance not only as a physical practice but also as a mental and spiritual exercise. This pose, as it mimics a tree with its roots grounded in the earth and branches reaching toward the sky, gives the individual a sense of deep connection to nature and the world around them.
2. Physical Benefits
In addition to strengthening the leg muscles and improving balance, this pose helps create harmony between the body and mind, serving as a tool for mental relaxation and reducing stress and anxiety. By regularly practicing this posture, an individual can gradually strengthen their sense of calm and inner stability, enabling them to face life’s challenges with greater power and confidence.
3. Mental and Spiritual Benefits
The Tree Pose offers a deeper connection with one’s inner self. It allows the practitioner to rely on their inner strength and stability, gaining greater focus, and embarking on an inward journey by letting go of daily thoughts and tensions.
4. Nervous System and Posture
Besides the physical benefits, practicing this pose also helps strengthen the nervous system and improve posture.
5. Mindful Living and Self-Awareness
Tree Pose serves as a reminder for mindful living and being present in the moment, as one must remain connected with their body, mind, and breath to hold the posture properly and for a longer duration. This pose offers an opportunity for continuous practice of being present and a deeper self-awareness, which can positively impact the overall quality of life.
How to perform the Tree Pose (Vrikshasana):
Introduction to Tadasana
- Begin in Tadasana (Mountain Pose) with feet hip-width apart.
- Ensure your body is straight and elongated.
- Evenly distribute your weight across both feet.
- Relax your shoulders, bend your elbows gently, and place arms at your sides.
- Spread your toes forward to connect with the ground.
Positioning the Feet for Tree Pose
- Lift your left leg and place the sole of your left foot on your right inner thigh or calf.
- Avoid placing your foot on the knee to prevent pressure.
- Alternatively, place your foot on your right ankle or leave it on the ground if needed.
- Keep your right foot firmly grounded.
Hand Positioning and Focus
- Bring your hands together in front of your chest to form the “Namaste” (prayer) position.
- If you feel stable, lift your hands overhead and join palms together.
- For added challenge, fully extend your arms and separate your fingers.
- If balance is lost, keep your hands parallel to the ground.
Maintaining Proper Alignment
- Keep your body fully extended, with neck long and straight.
- Ensure your head and spine are aligned.
- Relax your shoulders and avoid tension.
- Engage your abdominal and back muscles to maintain proper posture.
- Focus your gaze on a fixed point to help with balance.
Breathing and Relaxation
- Keep your breath calm, deep, and even.
- Aim for long, deep breaths to relax your body and improve focus.
- Synchronize your body with the ground and gradually relax your muscles.
Duration and Progression
- Hold the pose for 20 to 30 seconds.
- If you’re more experienced and stable, you can hold the position longer.
- Listen to your body and release when you’re ready.
- Afterward, repeat the steps with the other leg.
- If balance is challenging initially, practice will improve your stability.
Setu Bandhasana:
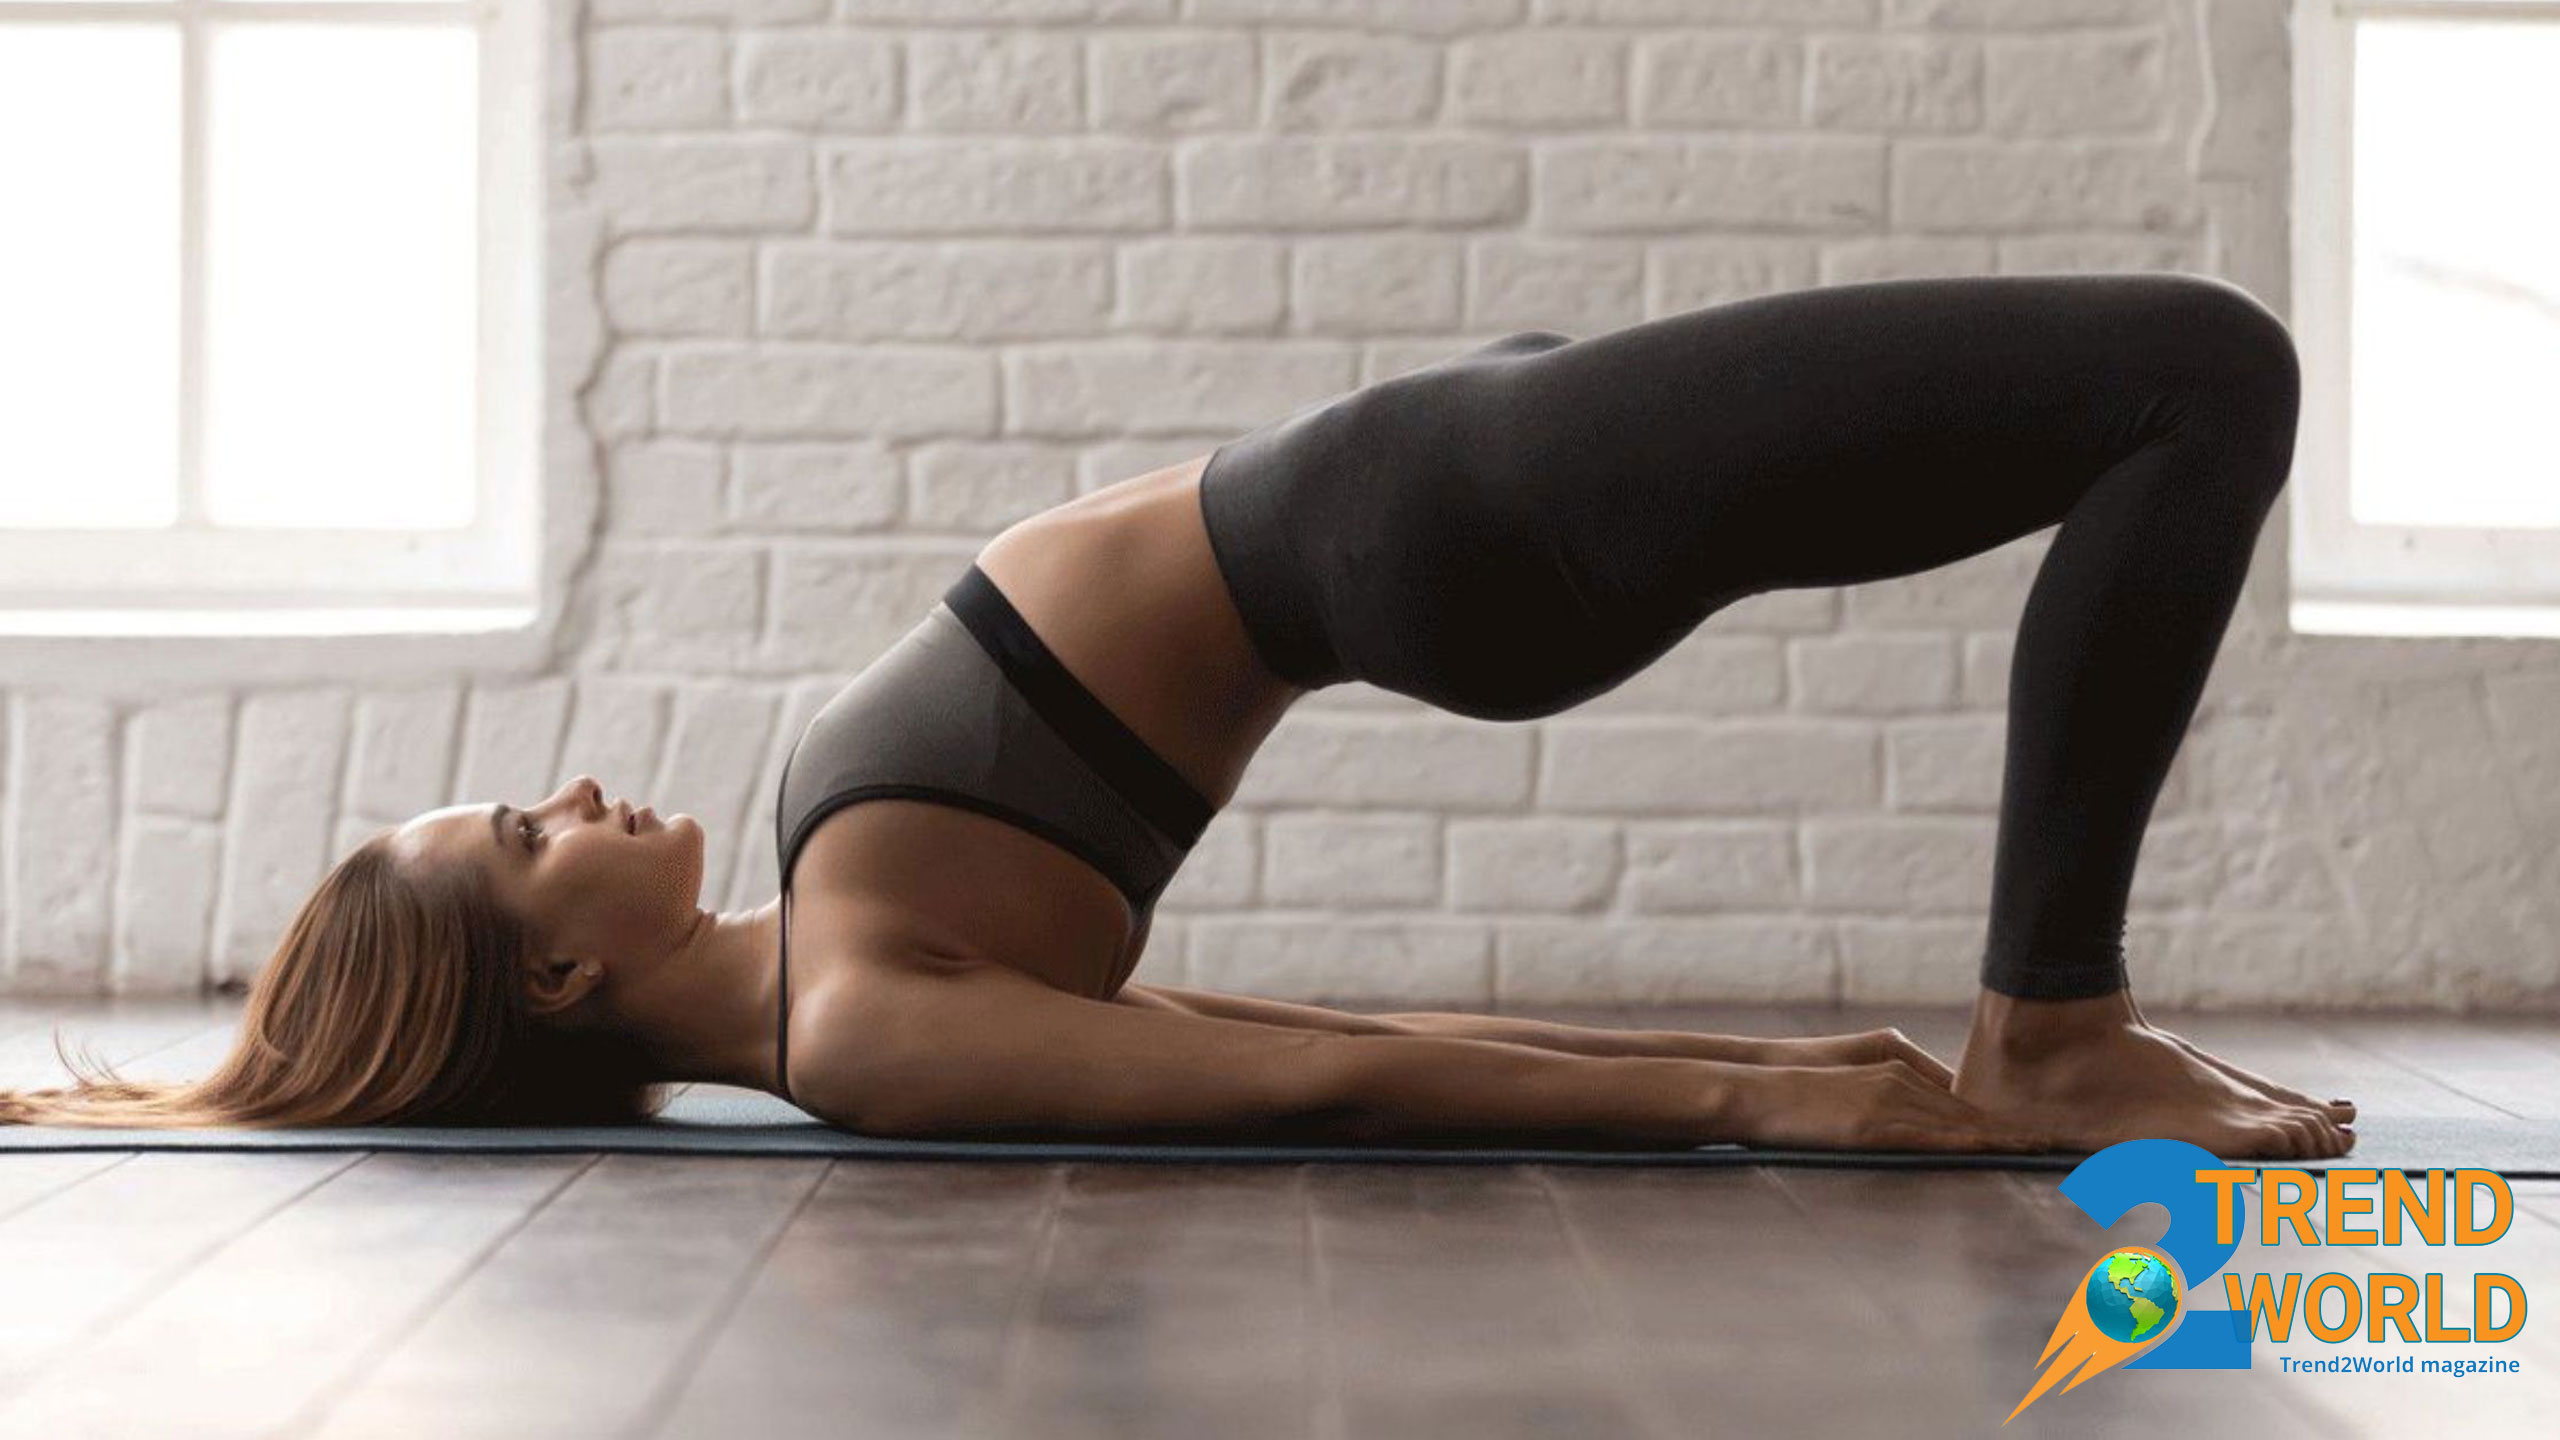
Strengthening and Flexibility
Setu Bandhasana strengthens the muscles of the back, abdomen, and thighs. It particularly targets the lower back muscles and enhances the flexibility of the spine.
Posture and Alignment
This pose promotes better posture by opening the chest, reducing tension in the neck and shoulders, and improving spinal alignment.
Circulation and Mental Relaxation
The Bridge Pose improves circulation, particularly to the heart and brain, which boosts energy levels and reduces fatigue. It also encourages deeper breathing, aiding in mental relaxation and stress reduction.
Benefits for Desk Workers and Those with Back Issues
Setu Bandhasana is beneficial for individuals who spend long hours sitting or standing, helping improve posture and alleviate back, neck, or shoulder discomfort.
Hormonal Balance and Thyroid Health
The pose is particularly helpful for strengthening the thyroid gland and regulating hormones.
Overall Physical and Mental Health Benefits
Regular practice of Setu Bandhasana promotes balance, improved physical strength, flexibility, and mental well-being, making it an excellent pose for enhancing both physical and mental health.
How to perform the Bridge Pose (Setu Bandhasana):
1. Starting Position and Setup
- Lie on your back with your legs hip-width apart.
- Bend your knees and place the soles of your feet flat on the ground, keeping your heels close to your hips.
- Ensure your knees are aligned with your thighs.
- Position your arms at your sides, palms facing down, with fingers pointing toward your feet.
- Ensure that your spine is relaxed and not under any strain. The neck and spine should maintain a natural alignment.
2. Initiating the Movement
- Inhale deeply and pull your belly in, pressing your lower back into the floor to engage the abdominal muscles.
- As you exhale, use your abdominal muscles, thighs, and legs to lift your hips.
- Press your heels into the ground, gradually lifting your lower back, mid-back, and upper back.
- Keep your neck and head in their natural alignment, avoiding strain.
3. Reaching the Bridge Pose
- Once your hips are lifted, place your hands under your lower back for support.
- Interlace your fingers or keep palms flat on the floor, depending on flexibility.
- Draw your shoulders together and move your chest toward your chin.
- Engage and stretch your abdominal, thigh, and back muscles fully.
4. Holding the Pose
- Breathe deeply and calmly to stabilize your body in the pose.
- Hold the pose for 15 to 30 seconds, or longer if comfortable.
- Ensure you do not feel excessive pressure in your back or neck. You should feel a stretch in your abdominal muscles, back, and thighs.
5. Exiting the Pose
- Gradually relax your abdominal and back muscles.
- Slowly lower your body, starting with your mid-back, then lower back, and finally upper back.
- Return your spine to the floor one segment at a time.
- Gently bring your hips down and place your feet naturally on the floor.
- Rest your arms by your sides, and position your feet hip-width apart.
6. Final Relaxation
- After completing the pose, rest in Savasana (Corpse Pose).
- Let your body fully relax and return to a restful state.
- This helps you integrate the benefits of the pose and feel more comfortable.
7. Important Safety Notes
- Perform the movement slowly and carefully.
- If you feel any pain or unusual pressure at any stage, exit the pose immediately.
- It is recommended to consult a yoga instructor for guidance if needed.
Don’t Miss Out on the Latest Trends! 
Follow us on TikTok for exclusive gift ideas, trends, and inspiration! 


Viparita Karani:
1. Introduction to Viparita Karani
Viparita Karani, commonly known as “Legs Up the Wall” or “Inverted Legs,” is one of the most popular and beneficial asanas in yoga. Not only is it a physical exercise, but it is also used as a method for calming the mind and alleviating anxiety in various yoga practices. This pose, by naturally reversing blood flow from the lower body upwards, helps improve circulation.
2. Accessibility and Simplicity
Unlike many yoga poses that require high physical strength, Viparita Karani is simple and accessible, making it suitable for most individuals, even those with little experience in yoga. By using a wall as a support point, it effectively enhances blood flow to the heart and improves vascular function. It is especially helpful for people who spend long hours standing or sitting, as it reduces pressure and swelling in the legs and ankles.
3. Mental and Emotional Benefits
This practice is especially ideal for those seeking to reduce stress and daily pressures. By creating a balanced and soothing position for both the body and mind, Viparita Karani can significantly reduce stress levels and induce a deep sense of relaxation.
4. Restorative and Nervous System Benefits
In addition to its physical benefits, this pose serves as an effective tool in strengthening the nervous system, as it allows the body to enter a restful and restorative state.
5. Digestive System Support
Furthermore, Viparita Karani is known as a restorative practice for the digestive system, as it places less pressure on the abdomen and digestive organs.
6. Improvement of Sleep Quality
Another notable benefit of this practice is the improvement of sleep quality. By reducing physical and mental tension, this asana helps individuals sleep more easily and enjoy deeper, more restful sleep. In fact, many people who struggle with sleep issues use Viparita Karani as a relaxing practice before bedtime.
7. Relieving Physical Discomfort
This pose also enhances flexibility and is particularly effective in relieving back and neck pain that may arise from daily stress.
8. Mental Awareness and Mindfulness
Ultimately, this asana functions as a mental practice as well, encouraging individuals to be present in the moment and focus on their breath, thereby fostering greater awareness and a deeper connection between the body and mind.
How to perform the Snow Heel Pose (Viparita Karani):
Preparation and Setup
- Space and Equipment:
- Find a calm, comfortable space free from distractions.
- Use a flat wall and a yoga mat, blanket, or cushion for added comfort.
- Consider using a cushion under the lower back or hips if there’s discomfort.
Positioning in the Pose
- Lying Down:
- Begin by lying flat on the floor, releasing any tension from the body.
- Adjust the distance from the wall so your legs comfortably reach it when lifted.
- Ensure your legs are perpendicular to your body, forming a 90-degree angle with your body and the wall.
- Press your feet fully against the wall, and make sure your legs are straight and vertical to the floor.
- Hips and Lower Back:
- Press your hips against the wall for more comfort, and consider placing a cushion under your hips to reduce pressure on your lower back.
Aligning the Upper Body
- Neck and Shoulders:
- Relax your shoulders on the floor and avoid any strain in your neck.
- Position your head naturally, without tension in the neck or shoulders.
- Arms and Hands:
- Place your hands by your sides with palms facing upward, which helps open your chest and relieve tension.
Breathing and Relaxation
- Breathing:
- Focus on slow, deep breaths: inhale gently to expand your abdomen and chest, and exhale fully to release tension.
- Keep the breath steady and continuous, maintaining full awareness of the body and mind.
- Relaxation:
- As you breathe, work on releasing tension from your body, fully relaxing during the pose.
- Maintain a calm and peaceful mental state, letting go of any stress.
Duration of the Pose
- Holding the Pose:
- Stay in the pose for 5 to 15 minutes, adjusting the duration based on comfort and experience.
- Beginners may want a shorter hold, while more experienced practitioners can extend the duration for deeper benefits.
Exiting the Pose
- Leaving the Pose:
- Gently lower your legs from the wall, bending your knees to release the vertical position.
- Slowly turn to one side and use your hands to help lift your body up.
- Take a few moments to rest either lying down or seated, allowing your body to return to its initial state.
Sukhasana:
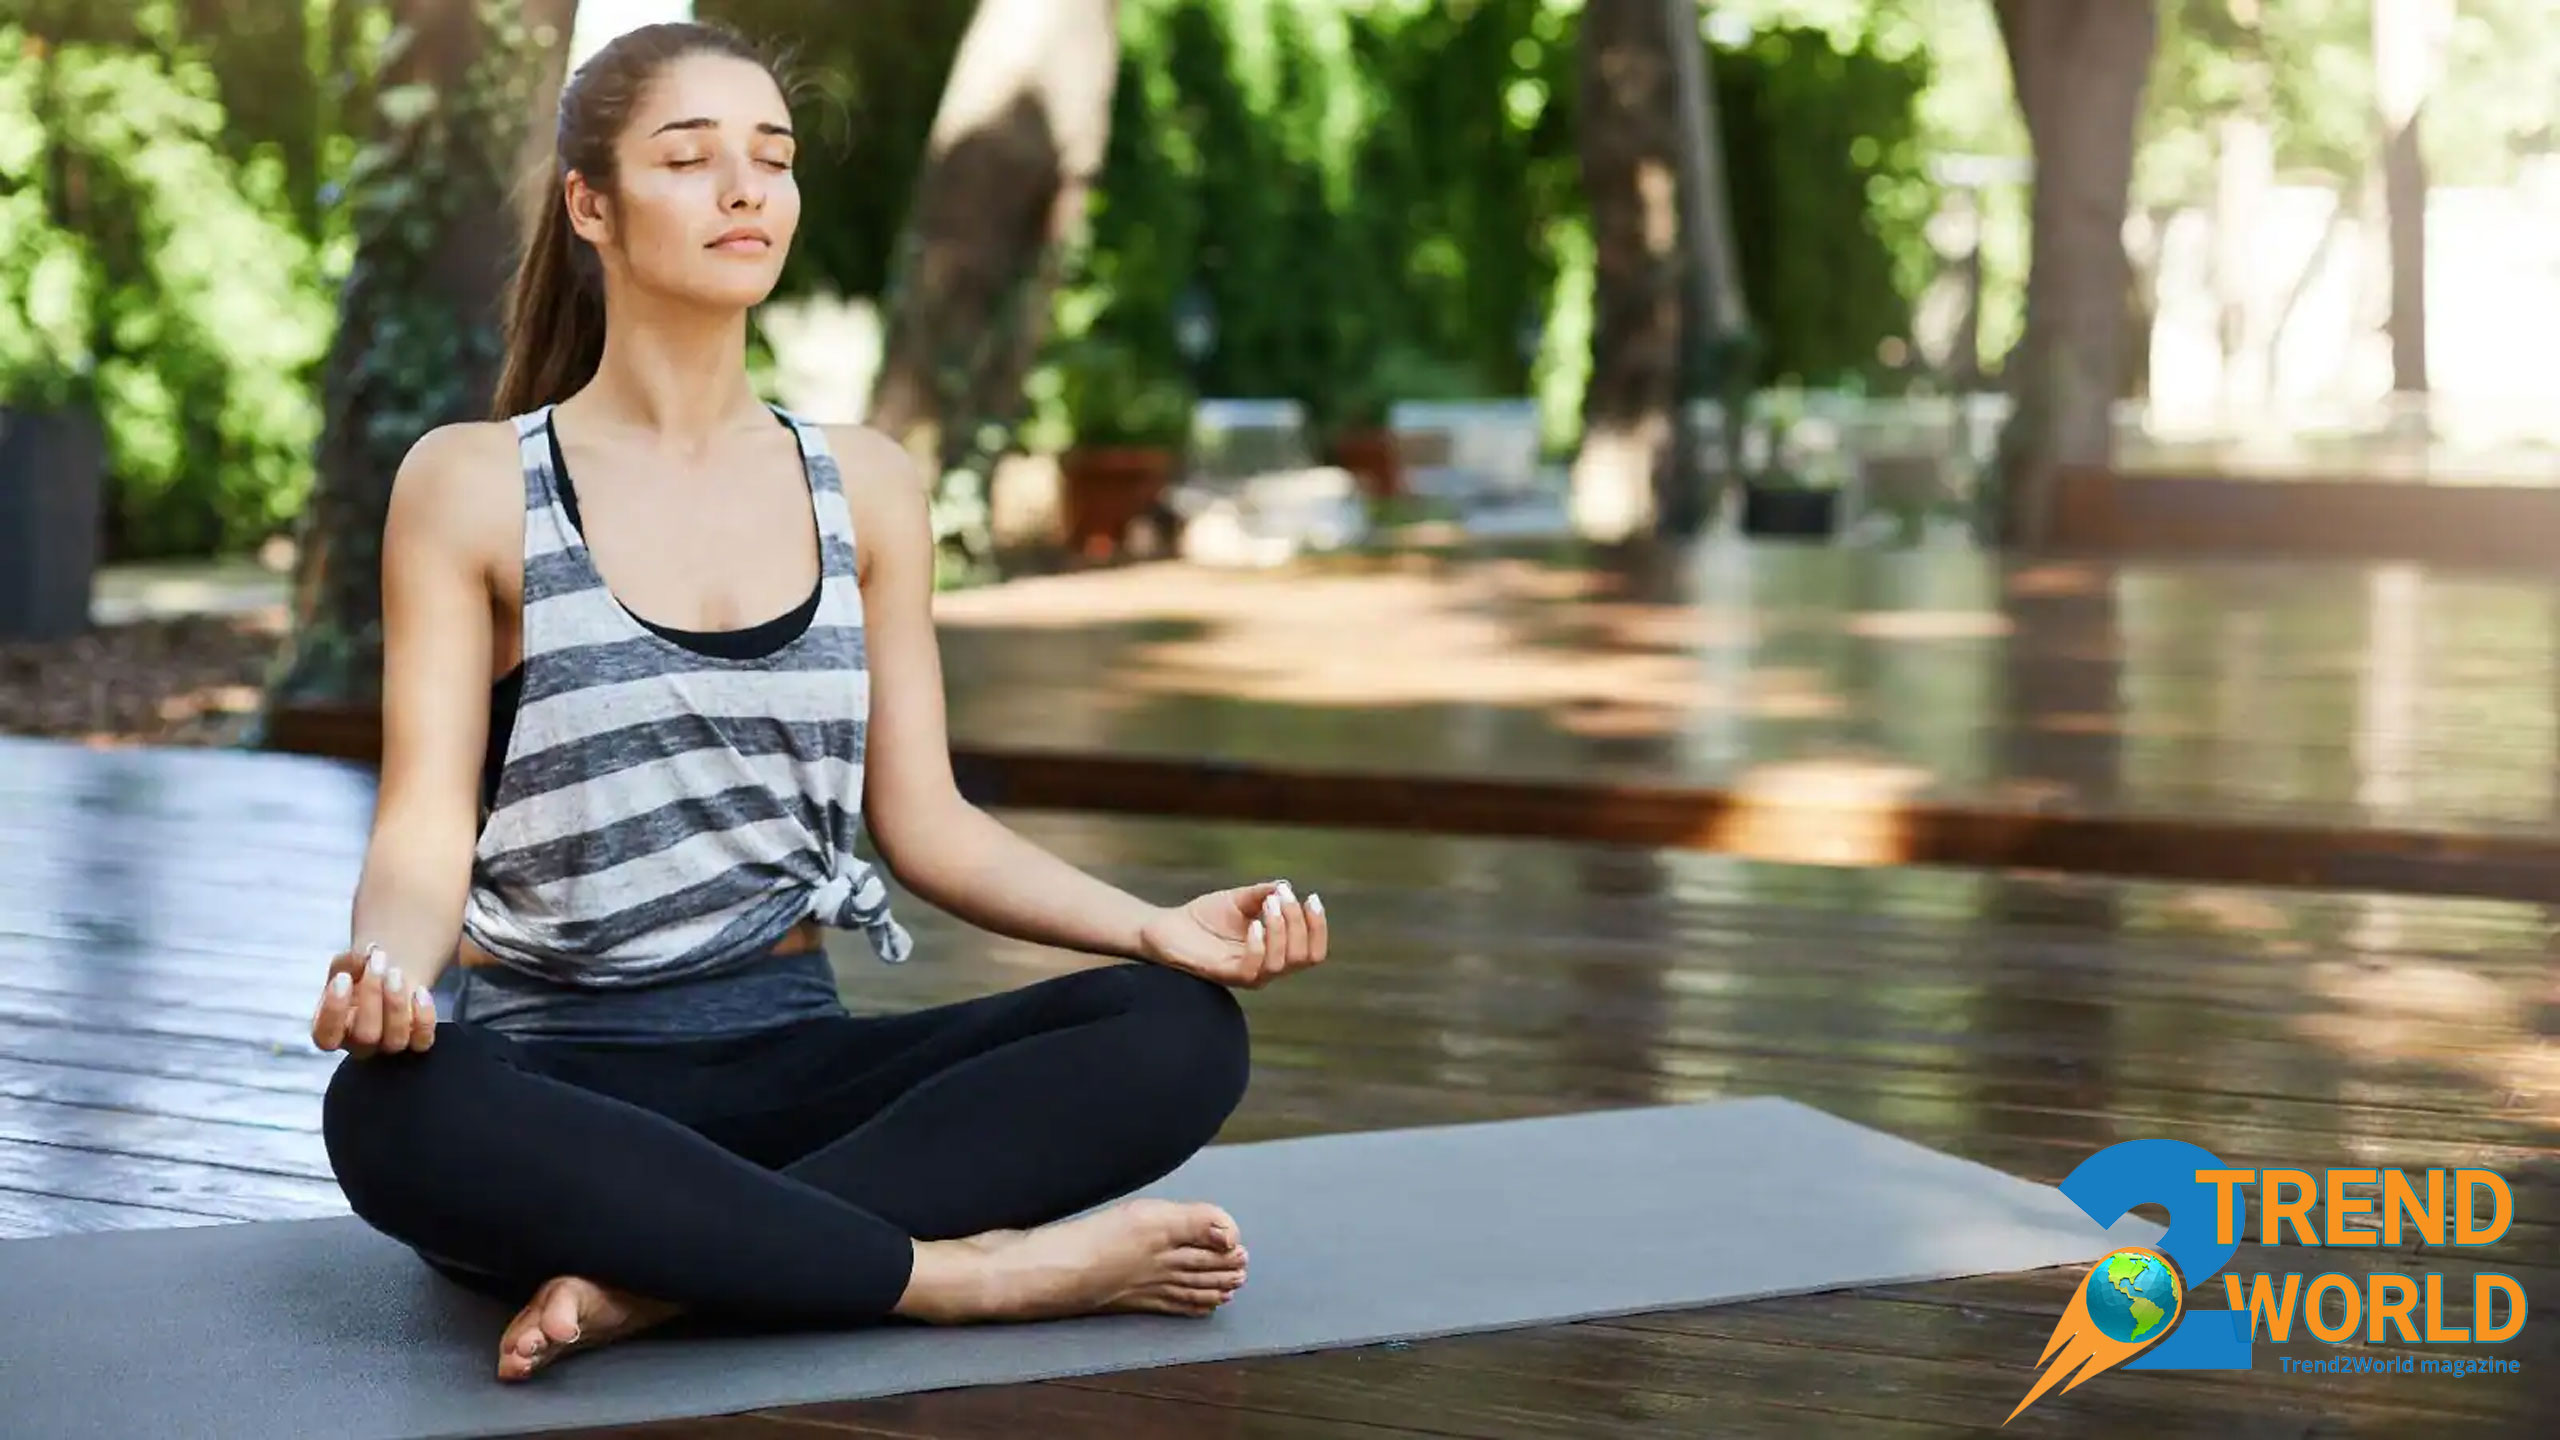
Overview of Sukhasana
Sitting meditation or Sukhasana is one of the most fundamental and yet effective yoga and meditation postures designed to create peace, enhance focus, and promote inner balance. With its simplicity and comfort, it has become one of the most popular and widely practiced exercises in the world of yoga and meditation.
Importance in Today’s World
In today’s busy and stressful world, where minds are constantly engaged in various thoughts and daily problems, practicing meditation in Sukhasana helps individuals disconnect from the external world and journey inward.
Accessibility for Beginners
Because this posture does not require complex flexibility or specific physical strength, it is ideal for beginners or those with less experience in yoga.
Benefits for Long Sessions and Relaxation
Additionally, for people looking for long meditation sessions or relaxation during the day, Sukhasana is known as a foundational practice for achieving mental calm and returning to the body’s natural state.
Strengthening Focus and Mind-Body Connection
This posture allows you to gradually strengthen your focus and establish a deep connection with yourself, without any pressure or tension in the body.
Stress Reduction and Energy Flow Regulation
In fact, Sukhasana not only helps reduce stress and anxiety but also aids in opening the chakras and regulating the flow of energy within the body. It gives you the opportunity to pay more attention to your breath and, through deep breaths, bring tranquility to your entire body and mind.
How to perform Sukhasana posture:
Preparing the Space
- Choose a Quiet, Comfortable Surface: Sit on a flat surface, like a yoga mat or cushion. A soft pillow under the hips can help with comfort and posture.
- Comfort Consideration: Use cushions to relieve joint pressure and enhance comfort during the practice.
Entering the Sukhasana Position
- Leg Positioning: Cross your legs, either placing the right foot over the left or both feet facing inward. The legs should not be strained.
- Use of Cushions for Support: If discomfort occurs, use supportive materials under the hips or knees.
- Alignment: Ensure the legs are balanced and relaxed, avoiding any tension.
Aligning the Spine and Posture
- Spine Alignment: Keep the spine straight and vertical, avoiding rounding or excessive curvature.
- Shoulder Relaxation: Shoulders should fall naturally and without tension, allowing for an open chest.
- Head and Neck Position: Align the head with the neck and spine, with the chin slightly tucked in.
- Posture Refinement: Adjust if there is any strain in the back or neck for better comfort.
Hand Placement
- Hand Position: Place hands on the knees, palms either facing up or down based on preference.
- Mudra Option: Form the Chin Mudra by touching the thumb and index finger tips together, with the other fingers open, to aid energy flow and calm the mind.
Focusing on Breathing
- Deep Breathing: Inhale deeply through the nose, letting the belly expand, and exhale gently and fully.
- Breathing Continuity: Maintain a natural and continuous breath to promote relaxation and mental clarity.
Focusing the Mind
- Eyes: Close your eyes or leave them slightly open to reduce distractions.
- Gaze: If eyes are open, focus on a specific point like the tip of your nose or a spot on your forehead.
- Mental Focus: Direct attention to your breath or a mantra to clear the mind and achieve calm.
Duration and Exiting the Position
- Holding the Pose: Start with a few minutes and gradually increase the duration as you gain comfort.
- Exiting the Position: Slowly open the legs and transition out of the posture, taking deep breaths before moving to a seated or standing position.
Our recommended product for you to have the best yoga experience – click on the image below!
 At
At